Loving L’Oreal Paris Ultimate Straight!

prize_DNw0iq1_2PXPtTJ

Hey ladies! If you are like me then your hair care routines knows no bounds. From shampooing, conditioning, straightening, curling, drying, protecting, sleeking, etc. There are so many steps to take when styling and taking care of your hair. I am so excited to review this VoxBox from Influenster, and share with you guys my thoughts. After receiving this bunch of hair products in the mail I took a couple of weeks in order to fully form my opinion and provide my readers with the best review possible of this line of hair products from Loreal, that way you guys can read before you buy.

First things first, here’s what I got:

L’Oreal Paris Advanced Haircare Ultimate Straight System

Their claim: L’OREAL PARIS’ FIRST SYSTEM WITH KERA-TOURMALINE FOR UP TO 48 HOURS OF LONG-LASTING STRAIGHT*
DSC_0074


My thoughts:  My natural hair texture is straight, however I regularly use a straightener for sleeping on my hair as well as air drying leaves my hair with weird waves and groves in the texture. Honestly, after trying out just the shampoo and conditioner and then on top of that the other straightening products I have had not used my straightener once.

  • Straightening Shampoo & Straightening Conditioner: My first impression of the shampoo and conditioner was how good the smell was! Oh my goodness the scent is very fresh and clean smelling instead of a heavy candy sweet scent. As well, I love the packaging from this whole line, using the rose golds and pink tones on the black bottles is very eye-catching. One thing about the shampoo I really enjoyed was that it lathered pretty well in my hair, and left my hair feeling actually clean. Instead of most of my shampoos that leave my hair feeling somewhat clean. Yet, my hair did not feel stripped or dry after use. When it came to using the conditioner, I was surprised at the results. I have naturally thin hair, and can’t use thick conditioners that weight my hair down. This conditioner did not weigh my ends down at all, instead they were left feeling smooth and shiny. 


  • Straight Boosting Pre-conditioner: This is the step that you are told from the packaging between the shampoo and conditioner. I do not use this step every time I shower, because honestly I don’t have a ton of time to shower everyday. I chose to use this step on days when I really wanted my hair to look it’s best for when I was going out with my family or friends for the day. This step was different for I never have used an in between shampoo and conditioner product before. I was expecting that it might leave my hair with a dirty look considering the directions tell you to apply it all over you hair, and not just at your ends. But to my enjoyment, after all three steps my hair was not anything but looking as I desired it would: straight, clean, and shiny.


  • Straight perfecting balm: This is the step I enjoyed using the most when it came to the line of Loreal products. The instructions told me to use this after my hair was dry and to apply all over the bottom half of my hair. Then continue to style my hair with either a blow dryer and round brush or straightener. This product adds extra heat protection for the use of hot tools, but I didn’t even need to use any after how well the shampoo and conditioner worked to keep my waves at bay. I like to use the balm to add the extra sheen and softness to my ends, whereas they are usually brittle and dry. 


Overall I am really impressed with the level of care that Loreal put into this line of hair care. It seems the company is moving in a more professional route, with the consumer’s needs in mind. Let me know if you guys have received or bought the line, and what your thoughts are. 🙂

Thanks for reading and love always Pearlsnheels ❤


Disclosure: I received these products complimentary from Influenster for testing purposes.

XO VoxBox

Hey guys! Long time, no see…With college and work I have had a ton on my plate but figured I would check in with a new box I received from Influenster. I wanted to share what I got, and see what kind of boxes you guys get! If you have not checked the site out, Infuenster is actually one of the better sites for writing makeup reviews and receiving products to test out and share the good, bad, and ugly about them. The nice thing about Influenster is that not only can you write reviews about products you already have at home, you can also answer questions others have about products, or ask questions you have about products before you go out and buy them. Not only do they have makeup and fashion products, but they also have areas about cooking, video games, pet supplies and more.

This month I received the XO VoxBox! I was super excited to get this one, and could not wait to test out some of the goodies inside of it! If you have already used Influenster before, and have gotten their boxes before let me know what has been the best box you have ever got! I would love to see what others have received before 🙂

Here’s a look at what I was sent:

What’s inside: Tide Pods with FebrezeSkinfix Hand Repair CreamColgate Optic White Toothbrush + Built-in Whitening PenColgate Optic White Express White 3 oz. Toothpaste, John Frieda Beach Blonde Collection: Shampoo, Conditioner, Sea Salt Spray, and John Frieda Luxurious Volume 7 Day Volume In-Shower Treatment.

Thoughts- I have already played with some products and am loving what I have tried! The Febreze Pods, are really cool! I have never used something like this to do my laundry before. These little pods contain all your laundry liquid in one capsule, and they smell simply amazing. I also have very sensitive skin, and was happy to say after using one on my clothes the scent did not irritate my skin at all. Because my deep love for coffee and what not, my teeth this season have acquired some staining…I was so happy to see that I was getting the Colgate whitening toothbrush and paste. Even after some of uses I can already see a huge improvement in the overall appearance of my smile. I think I am still stuck in winter mode, because when I saw the beach collection from John Frieda I was kinda off put for where I am we still have A LOT of snow. However, I am rally excited to bring on the warm whether with some new hair styling products to try. Overall the whole box was great and honestly has aloud me to try out some products I have not before. On that note, the packaging for the VoxBox was also super cute and very fun to open. Inside they also gave me some coupon codes for the products I received, so I can buy them after I use up the samples which is very nice of them.

20150318_222719
20150318_222724

20150318_222740 20150318_222730


Screen Shot 2015-03-21 at 2.12.32 AM

Also, I have been able to try out some gorgeous lingerie through the Influenster program! It is very reasonably priced, and gave me an extra boost of confidence in this chilly season! If you need a little pick-me-up or something to spice up your life check out Adore Me Lingerie. Plus click here to bring you right to the shopping site and to get a unique coupon code off your first order and free shipping  https://my.adore.me/x/RPNuIb

Thanks for reading & love always Pearlsnheels ❤


I received these products complimentary from Influenster for testing purposes.

Seasonal Inspiration: Fall!

bbeff0b13c258aed2acae3897d81cca4

Anyone else love fall, more than any other season? Every year the second the air starts to turn slightly chilly and the leaves change color, I am ready for the fall! I look forward to big comfy sweaters, hot apple cider, and deep colored lipsticks. As well fall is my favorite season to dress for, as well as apply my makeup. For me summer is way too hot, and I just wanna be in shorts and a tank top with my hair back in a top knot. WInter here in New England calls for a puffer jacket and boots..All in all the fall season is just right and seems to be the perfect season for layering, wearing romantic colors, and being comfortable.

To kick off the new season one of my favorite things to do is troll around Pinterest and see what the latest seasonal makeup looks and fashion styles are. ere is some things I found I wanted to share in hopes it will ignite you fall mood as well! Plus a couple extra fun things I found…I swear I could be on Pinterest for hours at a time it!

Here are some rich colors I found, these girls have gorgeous hair! I love warm drown mixed in with blonde layers as well as bright red stripes on brunettes. 
edb449956a8727b27baf883c8fe6481a

117822eac415516ff56458ba171ccb7e

Some pretty fall outfit ideas:

e618f6d78eaf304262f1cb14676e1031
I love the mixture of this deep wine colored shirt, coffee scarf, and tan belt, these colors layered together looks just like the season and color changes of the trees. This kind of look would be perfect with a deep plum colored lipstick for the more daring makeup appliers.
64ae644d8af4f836de116a74ad2c1af4
This is a nice and easy look to put together. Especially when it’s chilly outside it is so comfy to just through on layers and leggings with boots. This is a cute look but will also keep the mood casual for school or just going out. The wool socks peeking out is a cute touch, as well as an interesting pendant to dress up the whole look.
338f83653609446e65b38394db51002a
Black leather looking boots and leggings are so sexy and flattering! For those darker nights or going out to dinner this vampy look is just plain gorgeous with a bit of edge. Her hair let loose and wavy with the black sun glasses is very classy looking, I just love this whole ensemble.  
3cf8a78c7b0e5e005105f22ec123e835
I love these boots! They are from UGG of course, but they have a nice different quality about them. They look like the perfect mixture between moccasins and regular UGG boots without the classic fur. Included below is a link incase you want to check them out further!

http://www.countryoutfitter.com/products/44488-womens-somaya-chestnut-boot
ee996308eeed0bb5842f94882499968d

These laced up wedge boots are adorable. They give off the same appeal as regular leather looking boots sept the wedge gives you an added couple of inches that will elongate your legs! This style of boot also makes your feet tend to look smaller, as well wedges are a lot easier to walk in as appose to heels!

Some Funky Fall Nail Polishes:

206555f82639bb5978f48b746fa7077e

Deep plum colors are a fall must have as far as nail polishes go! The cool tone and dark finish is great for a fall color choice.

d278d45843427ed677295e611b624278

This matte royal blue polish is so regal and looks great with pale skin. I know personally I have very pale skin and burgundy fall colors don’t look very good with my skin tone; a color like this is a perfect option to bring out cool undertones in your skin!

Gorgeous Eye looks To Inspire you:

5fab914706843fd8fe68b545041f94a5

Sparkling coffee eyeshadow that will compliment any eye color. This eye is very wearable for a daytime look or a fancier outing you have to attend.

2c6c5c28e56aadd419273dac975a1744

This look is beautiful! I love how how the light reflects off of this deep chocolate colored eyelid with slight twinges of gold and amber. This is a classic fall evening look.

Just for fun I thought I would share some fun fall goodies!

This Tinker Bell pumpkin is sooooo cute! I could never pull off something this great but I would like to try perhaps this Halloween.

558a006965f6b20ee12e5f0e668b3a01

Black toffee apples! These look pretty cool, very Maleficent inspired. These would be great for a different treat to bring to a party “Poisoned Toffee Apples”

f58cd9903064d7860ef13b626f698e9fWitchApple

New posts coming soon, if you enjoyed reading please be sure to follow my blog for more great posts to come! Feel free to comment down below if you like any of these fall looks, or wanna share any styles currently trending that you’re enjoying! I’d love to hear any ideas you guys have for future posts I could write, so any ideas would be very appreciated. Thank you so much for reading & Love always Pearlsnheels

Vow VOXBOX!

f3652c481c73d9e1e1af1269ef748f2d

I have absolutely been loving Influenster and all the wonderful products they have sent me for review. That being said I always give my honest opinion on products, because I want to let you know which are really worth your time and money.

If you don;t know Influenster is AMAZING! They have sent me so many goodies and I love using their site for writing product reviews and reading them! This week I got my VOW VOXBOX in the mail.

Here are the wonderful products!


EcoTools Pure Complexion Facial Sponge

I have been loving this product so much, it has changed the texture of my facial skin! I was skeptical at first because it felt like I was sent a packing peanut to rub on my face. Once you place the sponge in water and give it a few seconds to absorb the moisture it becomes an amazing soft and exfoliating sponge! I love how convenient in size it is and how it leaves my face baby soft and did not break out my sensitive skin.
6c05a760ba7c8ecb03a7d54fc943f053Olay Regenerist Tone Perfect Cream

This was an amazing product to receive, especially because this is a pricy facial moisturizer. Once I tried it I realized why it retails for a higher price! It leaves your skin with a healthy dewy finish. My skin has never felt better than wit using this lotion. It does not have any harsh smells or perfumes. I love to wash my face and then apply this all over before I go to sleep for some deep moisturizing from this summer heat.

351f124fca5d1d606cb81049f868a8af

Tide-to-go

I have never owned one of this, but have always wanted to! I am so clumsy and always manage to spill something on myself, so when I received this I almost couldn’t wait for my next mishap to try my new spot cleaning pen out!

f13dbc7a408fb2f343f213f8f45c8c77

Pure Silk Shave Cream

This was a great size sample of shaving cream, and worked really well with my leg shaver. It foamed up very well, but smelt honestly way to much like chemical fruit. However it did not leave them smelling that way, so I can still use it without a problem.

351cee639e0b07db87b57fa4d0301f89

Sally Hansen Complete Salon Manicure

I love this nail polish so much! It is a gorgeous Tiffany Blue color! I would compare it to CHina Glaze’s “For Audrey” except it is more of a lighter Robin’s egg blue. One coat of this nail polish was fully opaque, and finished as if it had a glossy topcoat.

28794896e79736ce07a21dfed57f270fvoxbox-blogimage-popup2

Thank you so much for reading and love always Pearlsnheels 🙂


MKGLAM VOXBOX!

I received my MKGLAM VOXBOX! I have always wanted to try out Mary Kay Cosmetics, but was never lucky enough to get the chance to test any products from them out. When I received this box I was elated to try out all this wonderful makeup! Mary Kay makeup always intrigues me, I thought it was honestly for more adult women, but when I tried out all these pieces, boy was I wrong!

First things first, the packaging of the makeup sent to me was so adorable! Besides the cute chocolate brown and candy pink box clearly labeled Mary Kay, inside was a slew of baby pink tissue with a happy Hello! greeting inside the lid of the box. It is so lovely to see a company that puts a lot of pride into even the handling of their products. As well, came a card explaining all the goodies I got in my VoxBox.

Below are pictures and captions showing you all the great products as well as my honest first impressions!

The adorable pink and brown packaging...

The adorable pink and brown packaging…

Helpful cheat sheet of all the products included, as well as the pricing, and mini pictures as well.

Helpful cheat sheet of all the products included, as well as the pricing, and mini pictures as well.

They even included a product magazine to look through!

They even included a product magazine to look through!

IMG_20140504_142959

This is the Mary Kay NouriShine Plus Lip Gloss in Mango Tango. I love this color! It is great for a nice pop of color but doesn't go on too opaque. I like that it is a lighter lip gloss tint and I don't have to worry about it being to intense. This lipgloss has a nice applicator and finishes nice and glossy without any stickiness.

This is the Mary Kay NouriShine Plus Lip Gloss in Mango Tango. I love this color! It is great for a nice pop of color but doesn’t go on too opaque. I like that it is a lighter lip gloss tint and I don’t have to worry about it being to intense. This lipgloss has a nice applicator and finishes nice and glossy without any stickiness.

Here is the Mary Kay Cream Eye Color/ Concealer Brush, Mary Kay Translucent Loose Powder, and the Mary Kay Powder Brush. To be honest, the brushes have some fallout, but it is minimal. The concealer brush is great for under eye circles and blemishes. As well the loose powder has been amazing for summer when I want to set my foundation and doesn't leave a cakey look. I love to use this with the powder brush included, it gives my skin a nice porcelain soft texture.

Here is the Mary Kay Cream Eye Color/ Concealer Brush, Mary Kay Translucent Loose Powder, and the Mary Kay Powder Brush. To be honest, the brushes have some fallout, but it is minimal. The concealer brush is great for under eye circles and blemishes. As well the loose powder has been amazing for summer when I want to set my foundation and doesn’t leave a cakey look. I love to use this with the powder brush included, it gives my skin a nice porcelain soft texture.

This is the Mary Kay Mineral Cheek Color in Shy Blush and the Mary Kay Bronzing Powder. These two products go hand in hand with one another. These by far are my favorite products from the box. Together they remind me of Nars Laguna Bronzer and blush set. They are very pigmented and are perfect for a pretty flush pink and sun-kissed contour.

This is the Mary Kay Mineral Cheek Color in Shy Blush and the Mary Kay Bronzing Powder. These two products go hand in hand with one another. These by far are my favorite products from the box. Together they remind me of Nars Laguna Bronzer and blush set. They are very pigmented and are perfect for a pretty flush pink and sun-kissed contour.

Here is the Mary Kay Lash Love Mascara in I love Black. Just a coat of this mascara really does lift and separate your lashes without causing them to be clumpy or weighed down. I would definetly compare the quality of this to a higher end mascara and would recommend it for people who want a lengthening mascara!

Here is the Mary Kay Lash Love Mascara in I love Black. Just a coat of this mascara really does lift and separate your lashes without causing them to be clumpy or weighed down. I would definetly compare the quality of this to a higher end mascara and would recommend it for people who want a lengthening mascara!

This is the Mary Kay Cream Eye Color in Apricot Twist. This is a beautiful shimmery gold cream eyeshadow. It warms up your lids and gives them a beautiful grecian goddess look.

This is the Mary Kay Cream Eye Color in Apricot Twist. This is a beautiful shimmery gold cream eyeshadow. It warms up your lids and gives them a beautiful grecian goddess look.

Here is a photo of me wearing a bit of blush and the mascara!

Here is a photo of me wearing a bit of blush and the mascara!

voxbox-blogimage-popup2

I can honestly say that receiving this box really has opened my eyes and heart to Mary Kay Cosmetics. I have used and really enjoyed every product I was sent. I have definitely added some of these items such as the blush and translucent powder to my everyday makeup routine items. If you have not checked out their makeup before, I would definitely recommend giving them a try. Their company cares a lot about their customers and show that clearly through their care with packaging, service, and products.

If you have any questions or comments please leave them below! Or if you received this box as well let me know which products you liked or have been using the most! As always, Love Pearlsnheels ❤

After Christmas Shopping Haul! Target and Bath & Body!

Hey ladies, so of course after Christmas we must all run out and go shopping with our Christmas money! Or do what I do and spend most of it on hot chocolates and gas money lol. But, I went out and bought some really cute things from Target and Bath and Body. Both those stores are my favorites to go in when I am shopping, I always go in being like “I’ll just spend $25” but, I end up leaving and being like “How did I spend $100 on lotion and socks?!”

I went to Target and picked up some really adorable organizers for my makeup vanity! I am someone who puts all the makeup on and just tosses it on my desk with no organization at all. So, I decided to pick up some little bins and holders to give my vanity a more professional clean look. Get this, I bought all these little cute holders below, all for $1 each! When you walk into Target they have a little $1 section, and you can find all these little containers there currently. I think they are a great bargain, and are good enough quality to hold my makeup brushes, lip glosses, and other cosmetic extras! They had a lot of different colors, but I went with the pink and white holders, so I would have some sort of theme. Below, I also have a picture of my makeup vanity, which is basically is an Ikea desk, and a giant mirror with a lamp. Haha pretty make-shift, but I prefer this set up, I have had real vanity tables in the past and they are too small! Using an actual desk allows me to spread out my stuff when using it 🙂 If you guys want a post about how I organize my makeup and my vanity desk let me know in the comments down below, and I’ll be sure to write one.

20140102_000446

20140102_170108

From Bath and Body, I got lots of goodies! I went there this week during their semiannual sale! They have lots of great deals, and a million products to buy for super cheap after the holidays. Seriously this is a warning, it is dangerous to go there if you don’t have much money on you, I got a little carried away…

20140101_235616

Below, I picked up the Cashmere Glow shimmer Bomb, which is so incredible! It is a gel that you can rub onto your arms, legs, etc. and it is completely filled with different shimmery colored reflects. It also has a “glow” due to it’s slightly golden finish. This gel looks absolutely gorgeous on any skin tone, and smells amazing! After the sale discount, I got it for $3, which is an awesome deal for 6 oz of product. Next to it in the picture, is the Aromatherapy Sleep Lotion. I, like any other 20 year old, am a huge night owl. It takes me a lot of rolling around and starring at the ceiling in order to fall asleep at night. This lotion appealed to me, because I needed a new lotion and now I found one that aids in sleeping.  It claims that the honey and milk scent has a warm cinnamon and clove oil that promotes comfort and rest. Whether it actually helps me to sleep or not, the lotion is a great consistency; not greasy or sticky. It finishes smooth and silky, and has a very nice smell reminding me of fall; very warm and rich. The bottle itself is dark blue glass, and is very finely packaged. This lotion is originally $14 and After the sale I got it for $7!

20140101_235916

Next I picked up this True Blue Spa Apricot and White Tea facial scrub. I am obsessed with face products right now, and was really excited to pick up this product! I love this brand, and every product I have tried from them I have really loved! Their lotions are so incredible, and they have a pretty good selection of products at Bath and Body. Definitely check them out, if your looking for any good skin care products. I have already tried this out and the scrub is very coarse so you have to be gentle when cleansing your skin. But, it left my face incredibly smooth and clean feeling. It also smells really good, which is obviously important to me :p Next to it in the picture is by the same brand and it is the True Blue Spa Unscented Shea Butter. As I said, their lotions work better than any I have ever tried before, including high end products. This tube is a pretty good size at 6 oz, I will probably end up using it as my purse lotion, I love to use this stuff on my hands to moisturize. I like that they offers scented and non scented lotions. My skin is very sensitive, but I don’t need to worry about this lotions having any harsh scents that might irritate my skin. As well, if you have perfume, scented shampoo, etc. It is nice to have a lotion for your body thats scent won’t interfere with the scent of your other products. I bought both of these on sale for $3 a piece, which is phenomenal considering they are normally around $15 per bottle.

20140101_235858

That’s all for today, let me guys know in the comments below if you hit up the Bath and Body sale and what goodies you got! The sale doesn’t end at a certain date, it runs till supplies run out which is great, and dangerous for my wallet lol. Or you can comment on any of these products if you have tried them and love or not so much love them. If you have any questions about my makeup vanity or how I organize it feel free to ask as well 🙂 Thank you guys so much for reading, please remember to like this post and my page, also follow me for more blog posts! Love Always Pearlsnheels ❤

P.S Check out my Instagram! I am constantly posting under the name JillyBillyy

XoXo

My 5 Favorite Beauty Gurus on Youtube. What’s yours?

Basically since before I can remember, I have been addicted to watching my beloved and favorite beauty gurus on YouTube. I love all their videos from what’s in my bag videos all the way to my morning routine videos. I love reviews, makeup tutorials, hair styles, etc.! I have also learned a lot from some really great women, and men on YouTube, and it is always great to watch what other people think about products, or them using it before you buy. I have subscribed to lots of gurus, but there are some that I have been following and watching their amazing videos forever!

Let me know in the comments down below what your favorites are, I would love to get some ideas about new Beauty Gurus I could check out. Also, let me know if you share the same love for any in my list! Seriously check some of these guys out, it will change your life :p Below I also included some of their most recent videos, beauty and non beauty, all of them have lots of videos they post beside makeup related ones as well. The videos I have linked below are all great and Christmas related to get you all in the holiday mood! 🙂

1) http://www.youtube.com/user/AndreasChoice

I love AndreasChoice! I have watched literally all of her videos. She is fun, and has a great personality. She makes a lot of videos including beauty tutorials, DIY craft tutorials, and much more. Her videos have a lot of variety and are ALWAYS helpful and filled with great tips! Below is the preview of her channel, in her most recent video that gives you christmas present ideas!

Her most recent video: http://www.youtube.com/watch?v=kBsj0GCkHP0

2) http://www.youtube.com/user/Chanelette

Chanelette is a gorgeous girl who posts a lot of videos regularly! She is very sweet and posts some great makeup tutorials and reviews. She has a very inspiring classy style in her videos and is very inspirational when it comes to style. Below is a video of hers most recently showing how she decorates for Christmas.

Her most recent video: http://www.youtube.com/watch?v=00VcJXxr4WU&feature=c4-overview&list=UUHQa9lvcnFIzIddQ2DErd_g

3) http://www.youtube.com/user/heidicupcake

Heidicupcake, omg. I literally firstly go on YouTube just to watch her videos! She is very edgy and wild, which she shows in all her videos. She is funny and very real. Her videos are beauty related but also has some great body scrub and hair tutorials as well. She is a fairly new guru to the beauty world, but has made a really big impact with her videos so far! She is amazing…Below I have one of her beautiful glitzy Christmas makeup tutorials.

Her most recent video: http://www.youtube.com/watch?v=F7FHVzJ3mls

4) http://www.youtube.com/user/CarliBel55

CarliBel55 is a great YouTube beauty guru! She mostly posts fashion and makeup related videos, but they are all really helpful! She has a very glamorous styled channel, and always has powerful makeup looks. She even has some worth while work out videos you can check out. Below is one of her beautiful Christmas makeup looks!

Her most recent video: http://www.youtube.com/watch?v=3JEKTAXNB48

5) http://www.youtube.com/user/missglamorazzi

Missglamorazzi is a very fun and involved beauty guru. She posts many videos that are helpful and mostly tutorials. She has a sweet personality and addicting to watch! Even in the video below, she is currently hosting a video for every day of December. All these videos have great tips, tutorials, recipes, and looks!

Her most recent video: http://www.youtube.com/watch?v=fOSbhOq0dO8

I hope you guys enjoyed checking out my favorites, I would love to hear your opinions on who you love from YouTube! & Please remember to LIKE, FOLLOW, AND REPOST to support a fellow beauty blogger 🙂 Thanks for reading & Love always Pearlsnheels ❤

December 2013 Ipsy Bag! Review + Pics

20131218_233900

I was so excited to get the bag this month! The christmas packages are aways really special, and have fun products! When opening the bag the first product I received was the greeting card on the inside letting me know I can enter to win a year of free Ipsy bags.

20131218_234011

Then loose in the package (because it is too long to fit in the makeup bag) is the Mirabella Eye blending brush. I was so excited to receive a makeup brush in my bag, brushes and nail polishes are my favorite items to receive. I also needed a good fluffy blending brush, so this was perfect! The brush is amazing quality as well, it has a heavy shiny silver metal handle. It is long and has a good grip to it. The bristles are dense and high quality, with no fiber fall out. This is a really great brush that is soft and perfect for blending eyeshadows out.

20131218_234130

The makeup bag itself, is the best one I have received yet. I loved the last bags gold and pink glamorous look, this months is very dark, edgy, and sleek. It has a deep blood red inside fabric, and the outside has a black reflective studded feel, and is perfect for the winter when darker shades are worn.

20131218_234103

In the bag, I first pulled out a Pop Cosmetics eyeshadow trio, in Bright Up Your Life. The set comes with a bright shimmery white shade, a medium shimmer grey, and lastly a dark shimmer black shade. This set is perfect for a smokey eye, and will look great on the eye when blended out with the brush I also got. I wish that the white shade was shimmery, but the other two were matte. I find an all over shimmery eyeshadow look can be sometimes too much (as you can see in the swatches below) However, I love this brand, and the packaging has adorable flowers on the cover. It also comes with a little dual sides makeup sponge wand.

20131218_234318 20131218_234330 20131218_234341 20131218_234644

Next is the Be a Bombshell facial shimmer stick in Girl Crush. I am happy because this was the color I had wanted, and this brand always makes good products! I love their matte black packaging as well. The product is meant to be an all over kind of product, and can be used as a highlight on the cheeks, lips, etc. The actual shade and light reflects in the shimmer is beautiful, and goes on the skin with a smooth and silky finish, however it is quite messy in the tube, but has a good amount of product.

20131218_234926 20131218_234958 20131218_235037 20131218_235228

I also received the J. Cat Beauty Lip Crayon in Red Rose. I love red lipsticks and they go great with my skin tone, but I am a bit sick of getting the same exact color in every bag. It would be nice to see a dark cherry color or even a light pink. This crayon though has a very nice satin finish on the lips, and is easy to apply. The packaging is pretty cute, and has a lot of product which is great.

20131218_234709 20131218_234738 20131218_234831(0)

Best saved for last, THE NAILPOLISH. Omg, I love nothing more then getting nail goodies! I love every single Nailtini shade I have received in the past, so was uneasy to receive a polish by a different brand. Boy was I wrong, this is the best nail polish, hands down, I have ever used! It is a textured polish which I didn’t get and was worried it would look like the fuzzy nail polish. This nail polish though is such a gorgeous color and the finish is to die for. The nail polish is deep purple, with light pink and silver reflects of glitter. Mine is in the shade Sugar Plum Fairy, ha ha anyone else loveee looking at the names of the polishes? I want that task as a job, seriously. The amount of polish is great, yet slightly less than the Nailtini’s I believe and is by the brand Julie. I has never herd of the brand but now I just want to check out all their other polishes. The nail lacquer goes on very think, but can easily be cleaned up. I only used one coat, because I didn’t want to affect how the finish would come out (because the crackle ones don’t let you apply multiple layers) You don’t need more than one coat, because it is thick, it gives off great color payoff, and is fully opaque after just one coat. Once the coat dries, it begins to become bumpy and glittery. I was pleased that it was fast drying, and the polish doesn’t finish chunky, but looks as if you dipped your nail into pure purple glitter. This is a really fun polish, and I am happy to have it in my collection now.

IMG_20131219_03564820131218_234150 20131218_234141

Overall, this bag is one of the best I have ever received It was filled with really great quality and varied makeup products. I used almost all of them right away because I was too excited to wait! I can’t wait to see what we get next month already! Let me guys know what you think of this month’s bag, and if you enjoyed the bag as much as I did. Leave comments below 🙂 Thanks for reading & Love always Pearlsnheels ❤

P.S You can buy your own bag or sign up monthly at www.ipsy.com (It is only $10 a month!) It is a great bargain for great products, considering most products cost $10 or more a piece. They are also great because they include much more than just samples, like Birchbox does. These are mostly filled with full sized products, and actual makeup tools. Best monthly bag I have tried! I am not paid or benefited in anyway by my posts about Ipsy, I just love the bags and wanted to share my thoughts 🙂

Distant Love…5 Relationship tips for long distant lovers!

tumblr_kwq037vyph1qak6kio1_500 Hey there beauty lovers here is a different approach to my normal posts! My boyfriend and I are almost to our anniversary of four years! We are very much in love and happy and it has inspired me to create this post! Since we started dating, my boyfriend and I have been living and going to college in different states and it has definitely been hard, but so worth it. I know many of you have significant others that live way further than an hour or two away but these tips apply to all living apart, or as just dating tips in general! 🙂

1) Be loyal. This one comes as an obvious, but there are a lot of unfaithful people out there. Treat your partner how you would like to be treated. Don’t be flirting, seeing, or talking to any other person behind your lovers back. Be faithful to yours, and be real with them. If you stray or aren’t interested anymore then break it off, cheating  just causes more heart ache on both people’s end. It is a waste of time and effort in a relationship if someone is unhappy enough to cheat.

2) Be open and honest! When there is distance between any relationship, it can call for miscommunication and misunderstanding. Through texting, talking, or whatever you can never really know what are the intentions or tone that your other is speaking with. It is always better to call, or better yet video chat and really communicate fully especially with fighting or serious matters. Let them know how you are feeling, but as well how they are. Distance can cause an emotional toll on people, so it’s good to check in with one another.

3) Don’t freak out over the little stuff. This goes with choosing your battles. If you find yourselves fighting over something positively stupid, then drop it. Ask yourself if the fight your having is really worth the tie and energy in your relationship. Fight the big ones, and loose the ones that are for nothing. Constant bickering on top of distance is a sure way to drift apart.

4) Trust them, not cause them. Trust me, this is a lesson I had to learn. It doesn’t matter how much you trust your love, sometimes when their far away and you don’t talk and see each other as much, your imagination can run wild! You think oh they will find someone better than me, or are at some girls (or boys) house and aren’t staying faithful. This can cause you to panic a little and feel vulnerable. I am saying if they love you and you can trust them then you can learn to calm down. You don’t need to constantly be texting them being like where are you, who are you with, ect. Learn to let go and trust them or it can cause you guys to fight and develop un grounded trust issues.

5) Keep Current. Don’t just text all day long. Spice things up, and loose the boring to word texts! Skype, Instagram, snap chat, late night call, anything to keep up with your loved one. Talking through type only goes so far, but seeing them and hearing them or even getting silly face snap chats really can help you both feel like they never left.

Some Extras!

-My boyfriend and I write each other letters whether they are hand written or on an email. Just knowing they took that extra time to write you something long and sappy really is sweet!

-We are both artists so we draw each other pictures! This is something very personal and thoughtful, if you can’t draw then bake them some food, or play them online in a video game! Get creative!

-Keep a picture. My boyfriend has our prom picture on his desk where he is, and I have one of us together on my night stand. Little ways of remembrance is great for relationships.

-Enjoy the time you have together. If you get a weekend or whatever to see one another, don’t spend it sleeping in late or in a bad mood. Plan ahead and do some fun activities wheat he fit is baking a nice dinner together or getting an espresso and reading some books at Barnes and Nobles the possibilities for bonding are endless!

-Look forward to something. Holidays, birthdays, anniversaries, big events, vacations, all things you do together! If you have something coming up you are going to do together plan and talk about it and the time from then and the get together will fly by and get you excited! Love each other and listen and you will have a long an amazing time with whomever your heart is with. If you have any questions or comments let me know down below 🙂 Love always Pearlsnheels ❤

P.s Remember to like and follow me for some more cool stuff! 😀

fishing

Long Distance Love…5 Tips & Advice

tumblr_kwq037vyph1qak6kio1_500

Hey there beauty lovers here is a different approach to my normal posts! My boyfriend and I are almost to our anniversary of four years! We are very much in love and happy and it has inspired me to create this post! SInce we have been dating my boyfriend and I have been living and going to collage in different states and it has definitely been hard, but so worth it. I know many of you have significant others that live way further than an hour or two away but these tips apply to all living apart, or as just dating tips in general! 🙂

1) Be loyal. This one comes as an obvious, but there are a lot of unfaithful people out there. Treat your partner how you would like to be treated. Don’t be flirting, seeing, or talking to any other individual behind your lovers back. Be faithful to yours, and be real with them. If you stray or aren’t interested anymore then break it off, cheating  just causes more heart ache on both peoples end. It is a waste of time and effort in a relationship if someone is unhappy enough to cheat.

2) Be open and honest! When there is distance between any relationship, it can call for miscommunication and misunderstanding. Through texting, talking, or whatever you can never really know what are the intentions or tone that your other is speaking with. It is always better to call, or better yet video chat and really communicate fully especially with fighting or serious matters. Let them know how you are feeling, but as well how they are. Distance can cause an emotional toll on people, so it’s good to check in with one another.

3) Don’t freak out over the little stuff. This goes with choosing your battles. If you find yourselves fighting over something positively stupid, then drop it. Ask yourself if the fight your having is really worth the tie and energy in your relationship. Fight the big ones, and loose the ones that are for nothing. Constant bickering on top of distance is a sure way to drift apart.

4) Trust them, not cause them. Trust me, this is a lesson I had to learn. It doesn’t matter how much you trust your love, sometimes when their far away and you don’t talk and see each other as much, your imagination can run wild! You think oh they will find someone better than me, or are at some girls (or boys) house and aren’t staying faithful. This can cause you to panic a little and feel vulnerable. I am saying if they love you and you can trust them then you can learn to calm down. You don’t need to be constantly texting them being like where are you, who are you with, ect. Learn to let go and trust them or it can cause you guys to fight and develop un grounded trust issues.

5) Keep Current. Don’t just text all day long. Spice things up, and loose the boring to word texts! Skype, Instagram, snap chat, late night call, anything to keep up with your loved one. Talking through type only goes so far, but seeing them and hearing them or even getting silly face snap chats really can help you both feel like they never left.

Some Extras!

-My boyfriend and I write each other letters whether they are hand written or on an email. Just knowing they took that extra time to write you something long and sappy really is sweet!

-We are both artists so we draw each other pictures! This is something very personal and thoughtful, if you can’t draw then bake them some food, or play them online in a video game! Get creative!

-Keep a picture. My boyfriend has our prom picture on his desk where he is, and I have one of us together on my night stand. Little ways of remembrance is great for relationships.

-Enjoy the time you have together. If you get a weekend or whatever to see one another, don’t spend it sleeping in late or in a bad mood. Plan ahead and do some fun activities wheat he fit is baking a nice dinner together or getting an espresso and reading some books at Barnes and Nobles the possibilities for bonding are endless!

-Look forward to something. Holidays, birthdays, anniversaries, big events, vacations, all things you do together! If you have something coming up you are going to do together plan and talk about it and the time from then and the get together will fly by and get you excited!

Love each other and listen and you will have a long an amazing time with whomever your heart is with. If you have an questions or comments let me know down below 🙂 Love always Pearlsnheels ❤

tumblr_kwq037vyph1qak6kio1_500


Falling in love with Fall & Winter: 5 Looks for this Season!

IMG_20131006_135146

  Hey loveys, I decided to compile the best fall fashion styles, makeup, and hair looks for this upcoming season! Here in New England especially fall and winter are a time for packing away the shorts and flip flops and dragging out the old dumpy sweaters! BUT ladies, just because it’s cold doesn’t mean our fashion must fail. SO here are the best of the best fall and winter looks, so with the start of the cold weather you can transition in style. I will say you should still keep warm and comfy, but don’t need a snow suit :p

Let’s look at the hair! Fall is great to get funky with the braids and up dos, set let’s get fancy!

730754998bcf48194c09233a0c6a0b35

Whimsical and pretty! Here is a sweet style for medium hair lengths pulled back with a sweet head band.

17d9ed445e413b1877f8ec7e707b41a9

 Love this fresh faced look, complimented by and easy hair do! You get to see the nice length of the hair, but the bangs are twisted back to showcase your makeup!

40ea05cb620d4681be08195bad7dadd9

Great for those bad hair days! A simple fix with a cute bow!

2e6e655ad7b01320e96073226a9bc816

Beautiful and braided! If you have the time a french braid can really dress up your look.

e0a8518752476ce6923739b4e2b52bbc

A cozy cap can be so warm and perfect for those winter days when you have no time to wash your hair!

Let’s get dressed up, warm, and stylish. YES WARM AND STYLISH! 

3edd7b7daa205a144e8f6648c24d2e3e

What a smart looking outfit for the transition from fall in to winter. I love the dark jeans, leather boots, and a classy jacket is perfect for a complete look in the cold.

bb5cd644f216874a392fd305ab9e1a43

I am in love with this ensemble. A nude knit sweater turtle neck and a wine colored skirt is very romantic is feminine looking.

7e8f946e7911d64c57fc4382c91e81a8

For a girl tough to the cold, some cute pink Uggs and tights look adorable!

90536e0abb9f4b21185569a0fbe55b5b

I hate winter jackets! They are usually full of fluff and fattening looking. You can stay warm without all the padding, and settle for a nicer long jacket, this one has a particularly gorgeous violet color.

16017e0bd52c57e173bdf08ebed58082

Lovely textures! A snowy white long sleeve and vintage pattern skirt! I love the statement necklace on top as well.

Your nails get cold too! Better coverup! Here are some warming winter colors!

849ee17bcacf667f6a03c0e20b4bc184

Square and dark, love the deep blood red color. Very Vampy.

2c43880a27d73d925bb8abfb3e44593cGold and a deep taupe are always in style and look very dressy!

a0d007a021ed9b9a682eb60ccb91ecbb

Glitter and periwinkle attack! Very magical and a great color combo!

a95c3281eac85bcf48d9836c636e1728

This color is great! It is a witchy green, that is a great complementary color for all skin tones!

& For my favorite the winter and fall makeup looks!

19ba5dd278f1561af4e7a2edc3fbac13

Bold brows, and burnt cranberry eyes. This is a very vampire inspired eye, with a fierce and fiery twist.

b3687b91643276950370bc18f7ffde69

Great sparkling pumpkin look! This is a sweet eye look that pulls together all the colors of foliage and adds some special glitter.

49a99d084676b2f5a0f57bf6e798da5bGreat glamour look using greens and a highlight color. This would be beautiful for green and brown eyes.

ab572cf9e1f0047f21f19b6ec7381465

Yup, I dropped a photo of Miley. I know, I know Judge fest lol But I love her makeup her! There is something timelessly classic about a ruby lip and great lashes.

efc58b1e14c3708ee657c5db40248b04

A shimmery nude look is perfect for the everyday makeup wearer. This image is great because it shows you witch shadows to use where. This look really widens the eye and can go with any outfit.

That’s it for now, hope you enjoyed seeing what inspires my fall and winter wardrobe. Basically its a nice mix of classy taupes with pops of color! All images I got from Pinterest, it is a great site for fashion and makeup inspiration. You can check out my Pinterest here ! 🙂

Hope you enjoyed reading, thank you and Love always Pearlsnheels ❤

Luscious Cranberry Lips! A glossy review.

wpid-20131007_190241.jpg

Hey babes, so yet another review. This one is on a beautiful lipgloss stain, I recently got and tried out from Ageless Derma. My shade is in cranberry, I chose this color from the many great colors they have on their website http://www.agelessderma.com/lipgloss.aspx

wpid-20131007_190127.jpg

They have twelve beautiful shades to choose from, and also contain many natural enriched beauty skin products and makeup! They have a great set up on their site and  sell great products, for good prices, and you feel good using.

wpid-20131007_190027.jpg

This lipgloss in particular I feel is more of a glossy stein, because one application is all you need! If the lip gloss comes off some what throughout the day, which it lasts pretty long, it leaves the color stained on your lips in a beautiful matte shade. Cranberry, the shade I chose really compliments my fair skin tone, and has incredible color payoff. The best way to apply this lipgloss is with a lipstick brush, so you don’t stain your finger tips lol It also has a great smooth satin finish on your lips.

The consistency is just right, it is not chunky, or too liquidy. It is a nice creamy texture but make sure to keep the container somewhere cool because to tends to melt in high heat. It is a great lip product to have, and has become one of my go to lip products for fall 🙂

wpid-20131007_185946.jpg

wpid-20131007_185956.jpg

The packaging as you can see if very cute! It comes in a cute little black box, lined with a lilac purple interior. The lipgloss is a great size as well, I am actually more partial to the circle containers, than the tubes, so I am loving this packaging!

Check out their site, they have a lot of great natural beauty products, and is definitely a diamond in the rough site to find!

Thank you so much for reading and Love always Pearlsnheels ❤

Let’s Get Intense.. Circle Lenses Review

Hey loves, I know I have been MIA. BUT, I had a good reason. A few weeks ago I wanted to get circle lenses SO BADLY! I mean don’t we all want bigger eyes? If you don’t know circle lenses are..they can come in prescription and nonprescription.  They are colored lenses that are usually bigger in diameter than most contacts. The ones I am wearing are 15mm in diameter contacts, where as my usual size is about 14 mm. There are a lot of benefits to circle lenses, such as they can make your eyes appear larger, there are more styles and colors to choose from, and there is no prescription needed to order them! SO I have been wearing them for 2 weeks now and really giving them a go, to serve you up my own most honest opinion and review of them! 😀

wpid-20131011_144821.jpg

When you visit you optometrist, if you wear contacts, can recommend some colored contacts in the same brand that you already wear that are CRAZY EXPENSIVE. Yes, they have a range of colors that are all somewhat natural looking, and the most exciting color is light purple, and 3 pair will charge $175. Which is ridiculous. Being the cheepo I am I decided I was not going to pay that for colored contacts…I mean aren’t they just pieces of plastic you use and discard?! So naturally I googled. I found http://www.thedollyeye.com, and I read multiple reviews myself to see what their rep was. They are amazing contacts, that I have really grown to be in love with! Their site apart from contacts, has other beauty products as well, and is definitely worth checking out. Under the circle lenses tab, is where the fun begins!

They have so many colors, styles, themed, and sizes, and prescription/non-perscription lenses to choose from! The biggest challenge is figuring out from all the kinds which ones you want to buy, they are all wicked cool! I wanted like 20 pairs, for real :p On their site they also have links to pictures taken by real people wearing them so you can see better what they will look like in person, which is great.  AND they are only around  $25 per pair which is way better than the actual recommended ones from your doctor. In most cases always go to your doctor first, but in this case, I have been wearing contacts for 7 plus years now, and have tried many different contacts and brands, and as long as you buy them from a reliable source, know your script number, and use them correctly you are golden!

wpid-20131018_005610.jpg

As you can see, this is what you get when you order your contacts! Two vials containing your contacts in solution, I bought the Twilight Green ones, because I already have green eyes and wanted a more fun intense green look! Mine are in a -3.75 prescription, as you can see on the lid, and they even give you a little carrying lens case to keep them in. So to be honest, you have to get used to them…at first if you already where contacts you know the drill, don’t sleep in contacts, keep them clean in refreshed daily solution, ect. Circle lenses however, since they are much larger, deprive your eyes of more oxygen. With this being said, NEVER sleep in these contacts. Regular contacts you can get away with this once in a while, but which such a large contact lens, this can really harm and damage your eyes while you sleep. It is pretty much eye murder by means of suffocation lol

wpid-20131013_183352.jpg

When you first get them, take them remove them from the vile, by unscrewing the sharp (be careful) metal caping mechanism, and poor them into the lens carrying case and fill with fresh solution. If you have never warn contacts you can buy the solution at Target or anywhere for $3. It is hard to explain, but if you don’t know how to put a contact lens in, Youtube a video of it. Basically, what I do is gently pull down the lower lid, with head tipped somewhat down, and apply it to your eye while looking up, so you don’t touch your pupil, then let go and roll your eyes around till the contacts adjust to your pupil. If there is a lot of discomfort at first make sure they are clean, not bent, and are not in folded backwards, ha ha this happens sometimes…

AT FIRST, I got somewhat of a head ache…but naturally your body needs time to adjust to new things…as if you had a caffein headache. But after I got used to them, I have been absolutely loving them! 🙂 Mine are really intense but that’s just my style, but they have natural ones on their site as well! I recommend only wearing them for a bit when you start out, not to add stress on your sensitive eyes! Start off by wearing them for 6 hours maximum, and see how they feel. I don’t wear mine all day long, everyday. I wear them as more of a special thing, when I am going out, or want a dressed up look. I have gotten so many complements from people on these colored ones, it makes me just want more kinds. They are fun, and unique, and can really switch up your look. They are also great for people like me, who are always trying to make their eyes look bigger or more enhanced.

wpid-20131011_144929.jpg

I love pairing these lenses with lots of eyeliner and mascara, even false lashes, to really play them up and give them that Barbie Doll look, I mean why not? I suggest if you want them to look more natural, pick a color somewhat close to your eye color. If you want natural looking blue eyes, but have dark brown ones normally, it will be a little difficult for you can slightly see your natural eye color underneath the pupil opening in the lens, but only if someone was really looking. I have been wearing them for a couple weeks now, and completely in love, they are just that interesting pop to my makeup looks! I suggest giving them a try since they are so affordable, and you can really choose whatever ones fit your life best 🙂 You can find them at http://www.thedollyeye.com

Here is an example of a makeup look I rocked to enhance the color of the contacts, since they are green I chose a warm gold tone 🙂 You can see my own green eyes a bit, but it is not so noticeable in person, I love love love these bad boys! :p

wpid-20131011_145346.jpg

wpid-20131011_145349.jpgIf you guys have any questions about the wear of these or my thought on them please post in the comments below! I love hearing your feedback 🙂 Please stay tuned for more posts, I am trying to schedule a time to post more regularly. Thank you so much for reading and Love always Pearlsnheels ❤

What’s in my September 2013 Ipsy bag?!

Hey there! Sorry this is very belated, for some reason my bag took forever to come in the mail! I was excited to see what this bag would be like because the sneak peaks were so tempting!

First things first-The card in the inside! These are always fun to look at first because they show you what the theme for the bag is, and for this September month it is classy! And of course the back shows a bunch of coupons, and products that you get in the bag.

wpid-20130918_223959.jpgThen something new! In this month’s bag you get a foldout diagram of Michelle Phan‘s new makeup palette design with different shades and colors, and get a sneak peek into the collection. AND not even counted as a product in the bag, you get a bunch of little sample eyeshadow and blush in the bottom of this fold out! SWEET! I am actually very excited to create a look with this, and post about it! It is an example of her LIFE PALETTE.

wpid-20130918_224046.jpg

Below you can see an exaple of this giant pallete she came up with!

wpid-20130918_224130.jpg

Here is the little diagram below that comes with the fold out! It shows you exactly how to re create her makeup look and what shades to use where. Above you will  the little sample at the bottom right, these are the colors you get! There is a couple eyeshadow shades and a cheek color to try out a natural makeup look with.
wpid-20130918_224155.jpg

Next, is the bag! BUM BUM BUM! I get so excited each month to see the bags because they are great to have lying around my room to through jewelry or makeup in on the go! This week you get a classy royal blue bag with lace on the outside which is simple adorable!

wpid-20130918_225801.jpg

Below is a picture of the bag and all the goodies that I received! 😀

wpid-20130918_224307.jpg

The first product I received is the London Butter Nail polish in La Moss. I was so flippin’ excited to get nail polish in this bag, especially this brand because I have never owned a polish from them before and they are pretty pricey! The color I got was a deep blood red color and is so gorgeous for fall I was so happy to get this color that I immediately painted my nails with it in the picture below O.o

wpid-20130918_224854.jpg

wpid-20130918_224731.jpg

wpid-20130919_000311.jpg

Next is this gorgeous Cailyn Lip Tint in BIG APPLE, gosh I remember in a past Ipsy bag I received a purple eyeliner in this brand and I was so excited when I got this lip color as well! I love that they all come with little brushes in the top as well :p

wpid-20130918_225107.jpg

wpid-20130918_225331.jpg

The next product is the Star Looks Black Eyeliner pencil in Obsidian k01. I have already used this and can say I love it. It doesn’t smudge down your eyes throughout the day, and is actually very black pigmented and high quality.

wpid-20130918_225005.jpg

Next is the Nyx Eyeshadow in Morocco. This shadow is OKAY…I will have to give it another chance and try it out on my eyes, but when I swatched it, it took me rubbing my finger 4 times in the shadow to even have color show up…which is strange because their blush is pretty well pigmented and this eyeshadow looks dark so you would think it would show up dark not just light gray shadow. If you guys have any thoughts on this shadow let me know if it worked out better for you?

wpid-20130918_225425.jpg

wpid-20130918_225347.jpg

Next is this Elizabeth Mott, Mascara Sample which I have used and it is actually a really nice mascara! I like the length and thinness of the wand and it did not make my lashes clumpy at all! 🙂

wpid-20130918_225220.jpg

That’s it for the products I got in this month’s Ipsy bag. I was really satisfied with what I got this month, I think it was one of the best bags by far! I am excited to use Michelle’s new makeup and try out the Cailyn lip tint. If you guys love this bag or got different products than I did, let me know how you like them! I love to hear from you guys. Thank you so much for reading and Love Always Pearlsnheels ❤

Got Spectacles? Fall’s Latest Trending in Eyewear

The Warby Parker 2013 Fall Eyewear Collection is the latest and greatest when it comes to profound vision and high end style. Their fall collection includes classic and clean line styled glasses. They are the perfect collection for 2013, because the style these glasses bring to the table is nothing short of sharp and retro. They have a variety of styles to choose from for ladies and gentlemen and that is exactly what I would feel like wearing these sweet shades; a classy lady or gentleman. These glasses are very stylish and won’t break the bank either! My favorite pair I found from their collection, are called “Ames Whiskey Tortois” They are beautiful and retro, and are only $144 which is cheaper than most not very attractive prescription lenses out there. They are also high quality lenses with non-reflective properties and you can choose from a number of different styles, colors, and looks! The glass in the frames is really where the product really shines, apart from how cool they look! The lenses are completely UV resistant and have the most impact resistant material out there, as well as a scratch free generous coating! So no more worrying if they get dropped or bump that you will be seeing through scuffs for the rest of your life!

ames-optical-women-headturnames-optical-whiskey-tortoise-front

After looking through there newest collection, or any other great styles you probably will be like me and get super indecisive! I know I was…but the site is very accommodating and lets you not only view different angles of the glasses on a model, but actually let you use your webcam and virtually try them on! No more wondering if the pair you love will fit your face shape or not :p

They have stainless steel frames, and coated screws..Which if you are like me and have been wearing glasses for 10 plus years, you know there is nothing more aggravating than your frames bending or screws falling out and ending up loosing a lens! With these glasses, they are a great price but not a cheap quality. With the Warby Lenses, you have nothing to worry about except how sweet they look on you. The style, really what can I say except check them out! Really, if I were to own a pair I would go nuts! They remind me of a 50’s set of stylish glasses. In these bad boys I would feel like a vintage movie star and probably wear more red lipstick than I should..If this weren’t already enough to go ga ga for them, they have sunglasses too! This is pretty dangerous, because now I want a pair of glasses and shades. They have a huge range of cute retro sunglasses, prescription and non prescription. They have dark shades, green, blue, and are all just as adorable if not more than the glasses. My favorite pair out of the sunglasses that I looked through were the “Ellison Marbled Sandstone Sunglasses” they are so cute I can’t even tell you! They have a really funky marbled frame and vintage army green lenses. I seriously need these lol. ames-sun-women-headturn-thumb ellison-sun-marbled-sandstone-angle All in all the collection seems really great. They also have some awesome men’s styles as well in glasses and shades. Besides the awesome new fall collection they also have lots of other styles to choose from, which makes picking a pair even more difficult. I would love to get a pair a these glasses and let you guys know my honest opinion of the wear and prescription quality. From looking at their collections, I can tell I would fall in love with the style alone. If you guys wear glasses, sunglasses, prescription, or non, they have all kinds of products to choose from. I would definitely check them out if you get a chance, the link is down below to their fall collection, and main site. I promise you will find a pair that you need to have…I found about 20 lol.   The Warby Parker Fall Collection: http://www.warbyparker.com/fall-collection-2013 The Main Site: http://www.warbyparker.com ^^ Check out their other styles too, they even have purple and yellow glasses! :0  They are top of the line and very fashion forward. Let me guys know what you think, if you own a pair of these…or if you found any cute ones you guys want to own from their site! Thank you so much for reading and Love Always, Pearlsnheels ❤

Tips to Surviving Commuting to College!

Okay…this is not a beauty post…but in my personal experience with being a college kid commuting back and forth from home to school, these simple tricks and changes really have made college easier on me! :0 I am half way done with college and so far, it has definitely been a challenge commuting! Part of my really wishes I were living on campus, but it is not really in the cards for me and can’t reason with my self to spend 10 k extra each year to live in a 2 by 2 dorm instead of my nice big comfy room back home. I shouldnt complain it’s only a 30 minute commute, but one of the hardest things about traveling to college, is that I still feel like I am in high school. I wake up early…go to school and come home :/ I don’t feel like a college kid being all social and having fun, but hay it’s the life of a full time college commuter with 2 jobs lol. Any commuters out there finding it is hard to make friends? Sure I have many friends in my classes and I am pretty social, but it is not like I go out and explore campus with the girls, go get dinner, or what not…I go home to my family :/ But, all in all I am saving money, and really focusing on school over a social life I guess. What are you guy’s experiences with being a college commuter?

439f5080bb9d0a22159163e9f6f2459f

Here are some Tips!

  • Time Management! Theee most important tip. Get an agenda…write down all your classes, homework, assignments and get organized. There is no way you can manage college properly without having a managed schedule, especially if you work or internship as well.
  • Be Prepared. I always make sure, the night before each school day I have my clothes laid out with my backpack and purse, filled with everything I need for the day. DO bring assignments and extra paper, Don’t bring your whole room in your bag! I learned this the hard way…I would be traveling across campus on buses with a purse, lunch bag, art portfolio, backpack, plus other crap. Simplify your belongings as much as you can! If you can find a locker or are given one, use that opportunity! Store whatever you don’t need at home, and any heavy textbooks you can leave at school so they aren’t weighing you down. Remember to lock your locker, people are devious…See if you can share textbooks with your friends, this will save money, and weight in your bag! Being a commuter, you may not have time to go to your car or home, so what you have on you is what you are carrying all day long. ca934612c81b8d822b0f6021564e5b0d
  • Planning for weather can be a life saver…keeping a pair of rain boots and an umbrella in your car or locker just in case can change a day of soaking wet paints and scary hair into an okay walk across campus in the rain :p
  • Save Money. College is expensive enough already. You can really save money in little ways that add up to a lot. If you are driving in to school, consider car pooling. The parking spot fee and gas can break the bank, so see if there is a car pooling discount and drive in with your buddies!
  • Love Coffee? Skip Starbucks…Even Dunks is cheaper, or invest in a coffee maker…Trust me $7 Java Ship Fraps add up….If you love energy drinks, don’t spend $4 at a vending machine on campus, buy them at home where you can find them cheap at a store.
  • Packing a Lunch. If you don’t having a meal plan like other college kids…pack a lunch. I know it is totally middle school but buying food from your school’s cafeteria everyday will make you poor. Just throwing some fruit, chips, and sandwich in your bag and maybe a red bull will definitely be worth it.
  • Bring water and Chapstick…for some reason those are the best two things I have in my bag…I ALWAYS NEED THEM lol
  • Use your breaks wisely. If you have any breaks between your classes, work on some homework. Because I commute, I don’t want to do anything when I get home lol So on my breaks I snack and work on any homework, so when I get home I can mostly just relax and not worry about anything else! Besides, when you’re at school they have all the resources you need like the library, computers, and workspaces.
  • Give yourself time in the morning…Nobody likes being the smell kid in class who forgot to print out their paper on the day it was due….Give yourself enough time to gather your school stuff, print out a paper last minute, wash your face and brush your teeth. Trust me it relieves a lot of stress knowing you are prepared, looking somewhat decent, and have all your homework. This goes a long with sleep…driving, commuting, going across campus take energy not to mention actual class…being well rested, somewhat, is a must. 0c07a7577343de766dc0c8ee26f9aa06
  • Have Fun. Commuting and making friends can be tough…Look into your school and check out some clubs, events, and activities. Even getting a work credit, is a way to meet other students and earn some cash! Attending on campus sports events, fairs, and clubs or music groups will help you get out there and enjoy college without living at college.

I really hope these tips helped you guys out if any of you are experiencing commuting as I am! 🙂 Let me know what your tips are for college in general in the comments below! 🙂 Like for more college tips and posts! Thank you guys so much for reading, Love Pearlsnheels ❤

You can also check out Pinterest…Just type in college commuter and click search and there is a million great articles! 🙂

Better & Cheaper Dupe for Philosophy’s Purity!

wpid-20130916_190714.jpg

You must be thinking I am nuts by the title of this post…I know you are! But for real guys, I have done it! I have found the best dupe for the ultimately loved face wash out there Philosophy’s Purity. If you watch Youtube videos, go to Sephora, or are an avid blog reader…then you know that Purity is one of the most if not the most popular and sought out face wash recently. Although it is talked about, and people swear by it, I am here to tell you the price and quality of the Philosophy Purity face wash is not worth the price and time you spend to purchase it…and I have a better and cheaper alternative; Phisoderm’s Ph Balanced Cleanser.

If you have the cash, and do not have acne prone, oily, or dry skin, then sure go for it, buy the face wash that everyone has! But if you are like me and are on a beauty budget, have acne prone skin, and have combination oily to dry skin, then keep reading loves, momma is going to hook you up! :p

wpid-20130916_190736.jpg

So here we go! A 1 to 1 non-bias and honest review of the two! Pros + Cons, personal experience, and more!

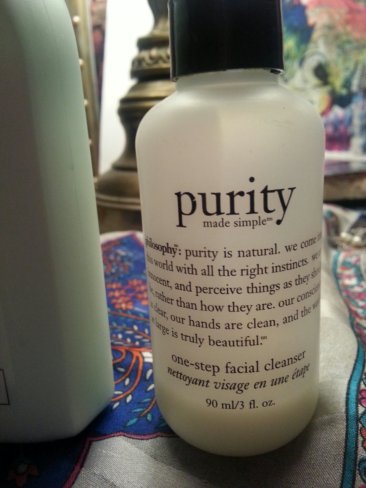
#1 Purity by Philosophy:

wpid-20130916_190808.jpg

Personal Experience:

To be honest..I had been using the Phisoderm face wash for years before I tried the Philosophy’s Purity cleanser. Although it was amazing, I wanted to try something new! After getting my ear talked off by beauty gurus on Youtube, about how amazing Purity is, I decided to give in and buy my own bottle. So upon going to Sephora, I found out how darn expensive this face wash really is. I thought to myself why in the heck is face wash, something you put on then wash off, so pricey?! But…I caved in and figured it must be worth the money considering all the hype it has caused. I was too poor at the time to afford the larger bottle for $22, so I figured the 3 oz bottle for $10 would be a good investment to see if I liked it first, before I bought a larger bottle.

When getting home, at the end of the night, I jumped in the shower, and gave my face a good wash. I was certainly not impressed upon first impression. But no product is amazing, with only one try. To be fair, I decided to use most to all the product before formulating any opinions of the face wash. After trying most of the wash in the bottle, I was certain it was not for me…or my wallet. Also, to give it a fair shot I tried it in the shower, out of the shower, with cold & warm water, after exfoliating, and without exfoliating, with a vibrating facial tool, and even just my hands washing my face. Let’s just say I tried it every which way in every condition possible…my opinion has not changed one bit.

Pros:

  • Ph Balanced
  • Creamy not soapy
  • Gentle around eye area
  • Contains mostly natural ingredients
  • Residue free finish
  • Very accessible
  • Well known name brand/reputation
  • Nice packaging Design
  • Descent Smell
  • Good range of sizes (Nice to have a Travel Size)

Cons:

  • Cost (Smallest bottle sz is $10, then 22, then $33, and $41) !!!!
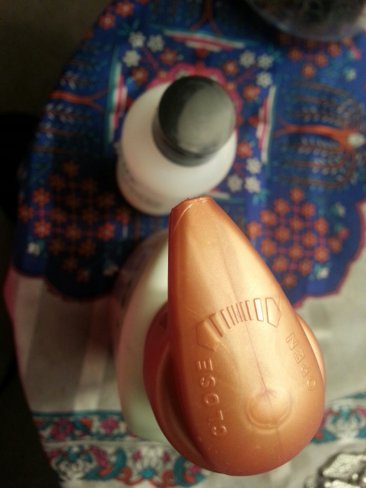
  • It is a pour bottle, not a pump (Unsanitary and messy)
  • Doesn’t behave like a ph balanced cleanser
  • Consistency is almost of water
  • Contains Alcohol
  • Contains Color Dye Yellow
  • Doesn’t claim to be dermatologist recommended

Thoughts: Although the packaging is very eye catching and clean looking, the functionality of the packaging is not great. The bottle would be a lot better if it were a pump, this really annoys me and wish it were changed! Although it claims to be ph balanced, it still leaves my face kind a blotchy, red, and not at all any calmer or clearer and is not dermatologist recommended apparently. It did not help any existing acne, and I felt as if my face became dryer. After washing, it feels like I still had foundation left on my skin, and I needed to wash my face again. This product did not benefit my skin in any single way. It was very expensive, and was not at all worth the cost. Although it is nice in a way that you can buy it almost anywhere, buy a number of sizes, and is natural and eye-friendly, the product contains alcohol and color dye which is pretty bad in my book considering I have very sensitive skin.

wpid-20130916_190837.jpg

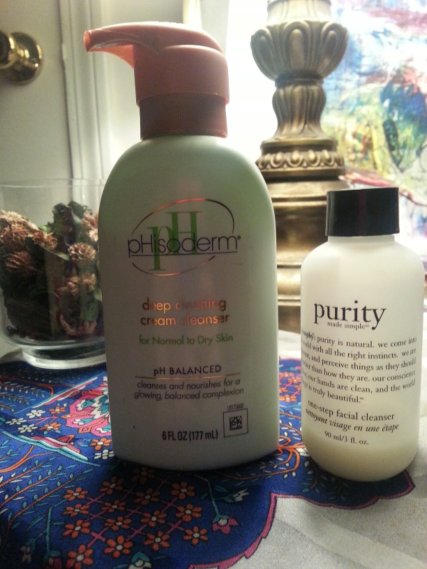
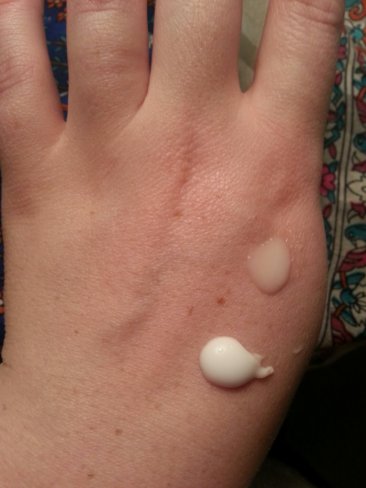
On top: Phisoderm’s nice pump bottle…and the small lonely unscrew to open Purity :p

On bottom: The first pump in the picture is Purity looking weak and running…The Phisoderm is on bottom looking milky and bold 🙂
wpid-20130916_190911.jpg

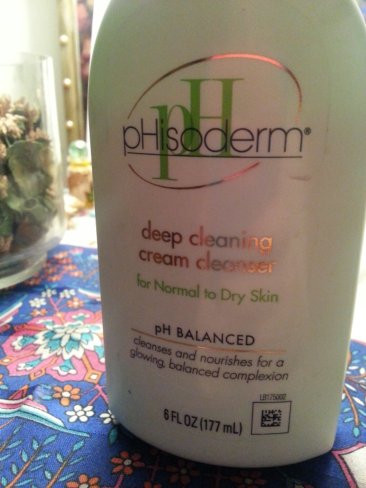
 #2 Phisoderm Ph Balanced Facial Cleanser:

wpid-20130916_190824.jpg

 Personal Experience: I first bought this face wash in 8th grade when my skin was more problematic. Back then I had a lot of cystic and hormonal acne, mostly on my chin and t-zone 😦 Since the 8th grade however, my skin really has come a long way and is mostly cleared up and calm. I definitely attribute that fact to this face wash! Although I stopped using it off and on, I only tried other cleansers because I felt tempted by raved about products and brands. This however is the only product to transform my complexion and not only clear up my acne but control my oily and dry patches.

Each time I would try another type of face wash, or the latest brand, my face would end up irritated, broken out, super dry and flakey, or more oily. After I abused my face each time by trying something new, I would always end up using the Phisoderm wash, to fix and repair my skin! Now, I only use this bad boy, and will never go back. I wash my skin with this every day, and most nights when I remember to :p I exfoliate 3 times a week or whenever needed with my facial vibrating brush as well. This is all I am doing for my skin now, and it has been a fool proof routine for beautiful skin! I pair the cleansing with an occasional toner, and everyday face moisturizer with SPF and I am in love with my skin now! 😀

Pros:

  • The Price! I got mine for $5 for 6 oz. (Double the size of the smallest Purity bottle, and half the cost)
  • Creamy milky wash, not harsh or soapy
  • Leaves my skin calm, glowing, and happy (Acting how a ph balanced cleanser should!)
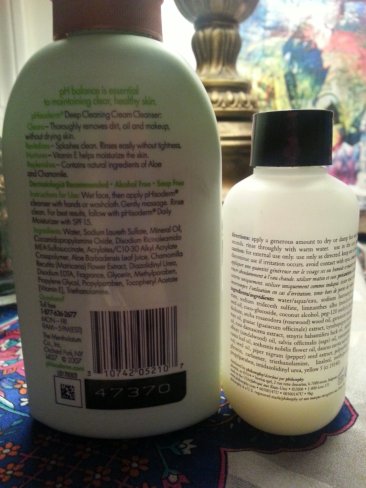
  • Contains all kinds of natural ingredients exactly the same as the Purity’s: Mineral Oils & Leaf Juice (Plus this one has Chamomile and aloe to sooth skin! Also Flower Extract and Vitamin E wish moisturizes your skin)
  • Dermatologist Recommended
  • After washing, my skin doesn’t feel tight or dried out
  • PUMP BOTTLE! The bottle has a nice and easy to use pump, no mess, spilling, or wasting…and is more sanitary!

Cons:

  • Accessibility…I got mine from Bed Bath and Beyond, you can probably find it at Target or Walmart, but may take some searching
  • Not as well known brand
  • The smell is very soap like smelling
  • Only comes in one size bottle
  • Not fun to have in mouth or eyes! Lol…

Thoughts: As far as a facial wash, this is a 10 out of 10. I love it and will not buy another face wash anymore! This is so worth all the money you spend on it, and when I say that I mean it’s amazing for $5! Even though it should be more expensive than the Purity, for how amazing it works! It is creamy and healthy feeling on my skin, and one wash is all I need. It is gentle, and my go to product. It has made my face clear, calm, and fresh looking. It doesn’t leave my skin dry, but still controls my oil buildup. Apart from being dermatologist recommended, and full of amazing ingredients, it even takes all my foundation, powder, primer, and what not off! Although you can’t find it just anywhere, and it tastes like dirt and stings a bit if you get it in your mouth or eyes…but why am I getting it in those places in the first place?! Only changes I would say is to the outdated packaging design, and smell…but hay it is better than alcohol and dyes being in the formula, and getting it everywhere like the Purity.

A Final Word: Obviously I gave both of these facial cleansers a try. I was not biased and  I tried both, and gave a good length of time to form an opinion and see how my face adjusted. I really did want to love the Purity, and wanted to see what all the hype was about. Although it cleans your skin some what, it falls short in price, handling, and results. It is a waste of your money, and time. I am not being harsh, these are just my completely honest opinions, and I will not buy the Purity cleanser again. There was nothing special about it besides its’ amount of fans. I am not being paid nor sponsored to say anything or promote anything, I just figured I would help you guys out and let you know what’s up with facial washes! :p I love the Phisoderm, and one hundred percent recommend it to anyone whether you have acne prone or clear skin, it works great for my family and I who all have different skin types.

Please give it a try if you are a non believer in the  so called magic of the Purity like me! :p Let me know what you think of either of these products, whether you love one or hate another. Leave me some love in the comment section 🙂 or let me know if you love Purity and think I am just bat sh*t crazy 😀 ha ha…

 P.S- Leave me some ideas to blog about, or more products you would like to see reviewed or dupes found for! ❤

 Want More?

Come see what I love on Pinterest http://www.pinterest.com/pearlsnheels

Get a closer look on my Instagram http://instagram.com/jillybillyy

See what I want to buy from Wanelo http://wanelo.com/jillybob

 Business Inquiries only email me at Makeup@pearlsnheels.com

 Thank you guys so much for reading, and much love Pearlsnheels ❤

xoxo

Tomato Soup Nails…Ipsy Nail polish.

wpid-20130908_233800.jpg

In one of my past Ipsy beauty bags, I received a Nailtini nail polish..These are literally my favorite things to receive in my bags. The Nailtini nail polishes are always very pigmented and full sized. My first polish I got by them in Millionaire, is actually my favorite glitter polish I own lol In my experience so far their polishes are really good quality and have a lot of cute colors! So in my last Ipsy bag I received this nail polish in Mai Tai.  At first I opened the little black box that it comes in and was like ew….Tomato Soup colored nail polish…because this is a color I would never reach for. I am usually all about the purples and blues, and definitely not in to V8 splash colored ones lol But I figured I would give it a try, considering I loved my last nail polish so much. After applying a base coat, two generous toppings of this nail lacquer, and a shiny top coat I was very impressed. The color is actually gorgeous and didn’t take forever to build up in color or dry. The applicator brush is actually really nice to apply the nail polish. The wand is longer and makes it easier to apply a clean looking manicure. Honestly, I was surprised how much I like this color. I painted two nails and the color was already growing on me! It is a beautiful tangerine color and looks really pretty on. Although it defiantly is tomato soup colored, I am really happy I gave this color a try and will be wearing it again! 🙂

wpid-20130908_233716.jpg

wpid-20130908_233731.jpg

Let me know what colors you guys have received in your bag! Or let me know in the comments if you like this kind of post and would like me to do mini reviews of products I receive in my Ipsy bag each month! Thank you so much for reading and love always Pearlsnheels ❤


Products That I Have Been Loving!

Hey ladies, long time no talk! I am so sorry I have been MIA, since starting college and two jobs I have been crazy busy! I figured this would be a nice post to come back with 🙂 Here are some of my favorite products I have been loving recently.

wpid-20130908_203655.jpgThe first product you see, yup I included it, Summer’s Eve Island Splash Cleansing Cloths. lol Say what you may, but if you have tried these you know they are really nice to have. They are so cheap too, only $1.99 for 16 little pouches. They are very portable, and you can just throw them in your purse! Seriously, before you scoff give em’ a go!

Next is Garnier Fructis Shine spray. Have you ever gone to a salon and they mist your hair after it is styled and your hair looks so shiny and polished and smells amazing?! Well here is the hair product, finally, that will do that too! I picked this up from Walgreens for $5 After I finish styling my hair I give it a few mists of this magic and my hair looks like it is fresh from the salon!

Next is the Michael Todd Pumpkin Face Mask. I got this from an Ipsy bag, and fell in love with it! Unfortunately it smells exactly like baby food. But, it has actually really helped the quality of my skin! I first exfoliate my skin, then apply some of this generously and let it sit for 5 minutes. Although it stings a bit, it makes your skin feel so clean and healthy afterwards.

Tresemme Fresh Start Dry Shampoo, I have been loving this stuff on those days I don’t have time to wash my hair and it needs some extra volume! I got mine from Target for around $4, and it has lasted me quite a while! The smell is alright, nothing too scented, and it really does make my hair look newly washed! I suggest spraying it through your roots, letting it sit for a couple minutes, then running your fingers through your strands and working it through your hair. This is a life saver!

The Elf Eyeshadow Palette for $10, I got this in an online order a little bit ago, and have been using it constantly since. The color pay off is incredible, and the range of colors in this palette is amazing! For such a cheap price, I was so excited to get these eyeshadows! It has smoky, purple, green, neutrals, blue, green, and pink shadows included.

The Jodrana lip liner in Silver Lilac. Ever since I tried their mascara, I have been addicted to their products. Like Elf, they are super cheap and have actually really good quality makeup. These lip liners are only $3 and come in adorable colors! If you have every watched Carlibel55 she swears by these as well!

Next is the Elf Essential Perfect Eyebrow Brush. This is an incredible tool to have, I have been loving it for makeup touch ups! I simply dap it in a bit of concealer and you can fix your brows and eyeliner to look perfect, and straighten out any mistakes. I got mine for just a $1.

Next is the Plus White 5 minute speed whitening gel! I love this for whitening my teeth. I picked mine up from Bed Bath and Beyond, and it has really whitened up my teeth! In the shower I just dab some of the gel on my teeth and let it sit for ten minutes, then spit it out, and brush. After a couple uses my teeth are so much whiter than they have been in a really long time! 🙂

I have found my favorite nail file! Of all time…literally. I got this from Sally’s Beauty Supply, and will never go back to any other kind of file. The grain is very heavy and can so easily file away any rough edges on your nails and shape them perfectly.

Lastly is the Spoiled nail polish in Mar-zi-panna. It is a great $1.99 polish dupe for the China Glaze polish in For Audrey. It is a perfect Tiffany blue and looks gorgeous on the nails!

Thank you so much for reading. Please let me know what your favorites are, and if you are a fan of any of my favorites! Love always Pearlsnheels ❤


Let’s fall into fashion: Hello September Trends! 4 Outfits

Hey babes, here we go September fashion. Holy cow is summer already at an end? I feel like my freshman year of college just ended and I am free for the summer, not ready to go back in one week in counting! :0 Bad news Bears, right?! Well for me the only thing that can make me feel better about going to yucky old school, is shopping. Anyone agree, the best part about starting school up again, is that you have an excuse to go spend money on clothes that you have no room in your closet for? :p

Lately I feel like fashion is flashing right before my eyes! One minutes it was tribal pattern, then chiffon, rose gold, hair feathers, bigger buts, and now 80’s metal groupie…

To each their own when it comes to fashion! I say whatever makes you happy to wear on your body, go for it! Unfortunately, I am one of those people who simply can’t choose a style…Know what I am saying? Some days I dress Hobo sheik, pink n’ girly, edgy and smoky, punk and pierced, posh and preppy. It is not that I want to be someone else, it is simply and only I LOVE CLOTHES. PERIOD. ha ha I am too indecisive and love everything and all styles to stick to just one. If anything I wish I could choose a fashion category, and lye there for life. But a las, I am unfaithful to all trends, and will continue to indulge in them all.

For these four looks I am wearing all clothing I found at Marshall’s. No, they did not tell me to write this post, I just simply love this store and kind of go crazy when entering the front doors. I go in there being all like “hey…I just need to check on some flip flops…” I leave more like “I just spent $100 more than I have on home decorations and socks….”

Marshall’s, if you don’t know, is also in the same company loop as Tj Maxx and Home Goods. I hope all my blogger friends out there know of these amazing stores, or are near one because they are literally incredible. They take high end fashion labels, and some independent ones and mark them way down, and make the different clothes and styles available for the poor college folk like myself :p They sell Coach, Ralph Lauren, and even Nine West. They sell everything from purses, shoes, makeup, hair products, women’s and men’s clothing, baby stuff, cook wear, undergarments, and even luggage. They are really a full circle kind of store. The problem is….I can’t resist and spend all my cash there, and go into a deep, deep shopping denial lol

But enough with explaining how bad my shopping habits are…Here we go, let’s rock the September grunge rock ensembles!

#1 I am rocking 2 pears of jeans in these photos, two ways to wear them in 2 looks. I am wearing a pair of sleek olive green skinny jeans. They were $20, and are amazingly soft, and fit my body shape, surprisingly well for being a pear shaped gal like myself. This is usually as expensive as their jeans get, these are on the nicer end. On top, I am rocking a red and black button up flannel, that even has cute little gold studded detail on the collar! :0 Mind blown moment when I saw this on the rack.. I thought it would be cute to throw a denim vest on over the flannel, denim is really making a comeback lately. I have even seen lots of girls wearing the notorious overalls again! The flannel was for around $15 and the vest for $15, what a steal. I am such a lumberjack here.

image

#2 LOVE this look…This is very much inspired by the newest Girl with the Dragon Tattoo movie staring Rooney Mara. Great movie, and the girl in it has an amazing dark and edgy style which I wanted to recreate for the colder months of winter. Here in New England, it easily gets to -15 degrees where I live, so when I feel like I want to wear an eskimo suit, I can at least try and be fashion forward! You are lucky if you live somewhere warm all year round! I found this incredible black leather jacket for $40. It has cozy sweater material around the neck, and zipper and buckle clasps on the sleeves and neck. It was incredibly warm, comfortable, and made me feel B.A >:0 even though I am really not…what so ever. I paired this jacket with the second pair of skinny jeans, these guys were a slim black ripped tight leg pair for $12.

image

#3 Classy in gray. Lately I have been loving the color gray when it comes to clothing. I found this cute flowy soft 3 quarter length shirt for $12. It has gold buttons, and black suede accent material on the sleeves and collar. It was great feeling on my skin, and will be a nice piece to just throw on. I also am wearing the black skinny jeans, but this top really goes with everything!

image

#4 Denim Jacket. What did I tell you? Denim is the new craze. This jacket as well, I fell head over heels in love with! Why must Marshall’s be so tempting?! This is a light denim jacket for only $20! It has some man made fading and rough up spots, as well as button accenting on the collar and sleeves. I love the material, it is very soft stretchy denim, so my arms don’t feel trapped or stiff. As well, the zipper is nicely placed on the jacket, it is put onto one side so the piece fits more flatteringly to my shape, and has pockets! 🙂 I am rocking the olive jeans here as well.

image

Let me guys know what you think of the latest trends we all find ourself falling into! This is just what is happening over here in New England, what is happening where you guys are at? I always forget that everyone comes from all over, so you never know what people like where :p We are also heading into the colder months, so sorry if this is a little inappropriate for your upcoming season! Please remember to like for more fashion blog posts! As well please follow me, it is free, and I would love to be your beauty blog babe 😉 Love Pearlsnheels ❤ 

The full package: Outfit & Makeup of the day!

Here is your two in one post my friends! This morning I felt like going with some peacock feather inspired blue eyeshadow to match my top. I got this top from Marshall’s for pretty cheap, lord knows I am addicted to that store! It is literally dangerous for my wallet for me to go there! My belt is just a simple leather chest belt from Debs from my local mall. I am wearing some old jean shortay shorts :p and some simple olive green leather boots I got forever ago from Target.
image

I have a lacy white tank under my shirt to better conceal my bubbies! ;p I have a light opal necklace on. The chest belt is optional, I just think that flowy shirts tend to make me look rounder, so I like to synch my waste with a cute belt, which also makes the outfit more dressed up. Funny tip: Chest belts actually make your chest appear larger…if you are feeling a little extra something something ;Dimage

On my right hand I have an aqua blue ring on and some blue beaded bangles paired with a silver feather wrap bracelet. I got the stackable bangles from Lia Sophia and the silver feather one from Aerieimage

On my left hand I have an all seeing eye hamsa bracelet, a blue beaded wrap one, and a blue chain bracelet I made :p On my left hand I have the matching light opal ring on my ring finger and a chunky silver heart ring on my pointer finger. I love stacking similar colored bracelets, they add a nice touch to your ensemble. image

Here are my cheapo Target boots, they are the Mossimo brand. I love the olive color of these guys and the mixed leather and canvas texture. I think jeans shorts with half boots look really cute for summer and are comfy :pimage

My hair is back in a messy bun, because I was having sort of a bad hair day :/ My eyebrows are filled in and gelled into place. I have a gold and green eyeshadow in the inner corner of my eye, and a peacock feather blue shadow on my outer corner. I am wearing my Jordana Best Lash Extreme Mascara on my curled lashes. My lips are wearing Revlon‘s Cupcake Lip Butter with some clear gloss on top. My skin is masked with my favorite Revlon Colorstay Whipped Foundation in 110.  My foundation is set with the Revlon Colorstay Pressed Powder, and concealed with the Hard Candy Glamoflauge Concealed in light. I misted my face with Elf’s Mist & Set just to make sure my face doesn’t go anywhere :0 image

imageThanks you guys so much for reading! 😀 Let me know if you like these duo posts, filled with my makeup and outfit of the days! Let me know what you think, and please like and follow me for more makeup madness 🙂 Love Pearlsnheels ❤ 


The Versatile Blogger Nominee! Thank you so much! :)

Hello lovies! I am so excited to say I was nominated for The Versatile Blogger award by BeccaBear & The Beauty Bachelorette!  I am so excited and grateful that I was thought of for this award! 🙂

vba

  • The rules are that you must post the award, and who nominated you for it on the post! 🙂
  • You have to give 15 awards to 15 other bloggers that really deserve to receive it!
  • Leave them a comment on their page to let them know that they have been nominated for this award! :0
  • Then post 7 Amazing things about yourself, what makes you and your blog special! :p

So I am going to entertain you with 7 things about myself? Well this will be hard…My life, as a 20 year old, hasn’t had any mind blowing, interesting, things happen in it! :p

1) I am 20, and was diagnosed with Rheumatoid arthritis when I was 18. Haha, most interesting things in my life are a bummer! haha whatever…I was on birth control for a year and it gave me this condition. The Depo Provera shot gave me Arthritis for life, fun stuff :0 So…I pretty much feel like I am a 90 old lady all the time.

2) Apart from being an avid beauty and makeup obsessor, I am a full time student and work 2 jobs! Let’s just say I am a busy girl! I go to school full time for Graphic Design. My dream is to be a graphic designer for the cosmetic industry one day. This means I want to become the person who designs all the makeup packaging design and creates the advertisements…I would kill to work for Benefit or Urban Decay. Life Dream for real. My other two jobs…I am a waitress for an Italian restaurant, and a pharmaceutical technician….random right?!

3) I have a tabby cat named Meatball. Of course, to me, she is the best cat in the world. When she was a kitten, and I first got her, her name was Bella for beautiful. Then she rounded out and became an almost 30 pound cat, then meatball just suited her lol

4) I am a TV show junkie. Although I love movies just as much as anyone, I get addicted to series! Feel free to chime in if any of these are your favorites! I am obsessed and watching/finished Spartacus, Game of Thrones, Dexter, Homeland, Bourgeois, Dr. Who, Catfish, Teen Mom, Bar Rescue…such a random line up, and there are many more! :0 haha I may have a problem…

5) Music…I am obsessed with the oldies…or older considered music. May favorites include Bob Dylan (got to even see him in concert),  Janis Joplin, Elvis, and Johnny Cash. Something about the quality of music, and the lyrics just really intrigues and interests me. I even have the lyrics to the Johnny Cash song I Walk The Line lyrics tattooed on my ribcage. Which brings me to tattoos and piercings…I have only 2 tattoos, wanting more, and 12 piercings.

6) I am obsessed with Hayao Miyazaki directed movies. I saw the first on Totoro when I was little, and have been in love with them ever since. As an artist, the illustration and storyline really caught my eye. The movies are really well thought out and high quality. As well they are really sweet and incredible, I love the characters and settings  in each movie ❤ Some of my favorites are Kiki’s Delivery Service and Howl’s Moving Castle!

7) I am a little bit of a boy at heart…Trust me, most of the time I am painting my nails and putting makeup on for hours. But a large part of my life and growing up was as if I was a boy :p Haha, I had brothers growing up and we spent most of our time instead of dressing up, playing Lincoln logs and legos. We learned and love to fish, hunt, and play video games. I do all of these to this day, I am obsessed with Skyrim, love to fish and hunt/eat animals, and have started long boarding with my boyfriend. I guess I am just a dolled up tom boy :p

Sorry for my super random list of interesting things…this is just what my life is made up of I guess 🙂

Here are the amazing bloggers that I have chosen to nominate, you all are wonderful bloggers and deserve it! 🙂 CHECK THESE GUYS OUT!

Thank you guys so much for nominating me, I feel so lucky, and really appreciate it! 🙂 ❤

Love Pearlsnheels

❤ xoxo

DIY Cute Bow Back Shirt! So Easy! No SEW!

Hey there girlies! Here is something new to my channel! Do it yourself stuff! Although this is my first one and I will include instructions and pictures of what the results came out looking like, but my next one I will add some picture by picture tutorials for my next DIY posts! So please bare with me 🙂 In this DIY idea post I will show you how my t-shirt came out, the front and the back. Plus the video that inspired me to make it, so keep reading! :p

wpid-IMG_20130816_185036_237.jpg

wpid-IMG_20130816_185131_579.jpg

I got inspired to create this look because I had so many large t-shirts lying around, and I love the print on them, but I wouldn’t wear a plain large t-shirt, it is just not my style :p I definitly like flashier clothes, and have been really into shirts with cut outs and that have been hand altered. I love fringing, bow back, bowl neck, and more styles you can do with scissors! So I set a side all my cool looking t-shirts that were way too big for me and decided to look up some Youtube videos on DIY t-shirt cutting. There are so many out there, so I would suggest looking through them because there really is a million ways to cut a t-shirt lol :p

I used my Thor shirt….Of course! I love Thor, and this shirt, but the neckline was too high for me, and the bottom was baggy so I never wore it :/ SO, I grabbed it, some white chalk or white eyeliner pencil (both wash out in the washing machine) some scissors, and your body! 😉 haha. The best way to figure out how you want your t-shirt to look is by wearing it first! This way you know exactly how it will look when it is all cut up and finished.

For this look in particular, the bows, I used the video below by Salina Siu. Although the girl talks for a bit in the beginning, it is a really easy and good tutorial to follow! This is a no sew video, which is nice if it is a last minute creation before you run out the door for the night. But if you want something more secure, that will last being washed, without being worried about things coming undone, just grab some black thread and a needle. Hand sewing is so easy, even if you have never done it before! Just putting a couple stitches here and there on this shirt will be quick and ensure that the ties are secure, but without sewing it will work just as fine 🙂

I added my own variations to my shirt after the video! I wanted to dress mine up a bit more, so I used four bows in the back because my shirt is larger. I also, wanted to make it into a smaller strapped tank top so I took some left over cloth from the sleeves and tied it around the top of the straps and pinched it together with the inner neck hole and held it together on each side with strips of the left over fabric like you do on the bows on the back. I also used some extra strips of cloth from the other sleeve and cut a hole in the bottom of the t-shirt on each side of my waist and tied a little bow. This brought in the shirt two inches so it was more form fitting on the bottom and less baggy 🙂 and made it look a bit cuter! 🙂


I hope you guys enjoyed this post and it was helpful for you! Let me guys know if you like DIY posts and I will do more of them, but with picture by picture directions! :0 Thank you so much for reading and Love always Pearlsnheels ❤ 

wpid-IMG_20130816_184742_719.jpg

Excuse the tattoo.. haha :p

MORE RANDOMNESS…Help me choose a phone case?!

So this is so random, I know, but I just bought a new phone for myself, and I want to buy a cute case for it. There are so many amazing looking ones out there, that I simply can’t choose! I have narrowed it down to a couple of my favorites, and was wondering if you could comment and tell me which one I should get. I know this isn’t a huge life changing decision, but hay money is money, and I really can’t choose they are all so amazing! :0 and I really shouldn’t buy more than one lol Ain’t nobody got money fo’ dat’!

Many people think animal cases are bulky and weird looking, which they are, but I have picked up the fever for them. They are so cute and fun, and are actually very protective of your phone because they cover so much with a thick plastic.

I will appreciate any feedback, and would love some help choosing, I am a tech junkie so I love getting all the bells and whistles for my electronics :p

Here is the one’s I want…now which one should I get?

Pooh Bear?

$(KGrHqRHJCYFHIQ75LgtBR5wDTW9tg~~60_3

Pink Minnie Mouse?

$T2eC16NHJG!FFmQ2c3QCBR5wDHOSUg~~60_3

Cute Little Stitch?
$T2eC16h,!zcE9s4g4wI-BRzO5mKRr!~~60_3


Nerdy Hello Kitty?
$T2eC16Z,!yEE9s5jGJhYBS!gWibcYw~~60_12

Or should I get a pretty crystal case like this one?

140


P.S If you guys have the Samsung Galaxy Note 2, let me know what you think about the phone and if you like it! 🙂

Thanks for reading, and the help! Love always Pearlsnheels ❤

Green Makeup for Green Eyes…Another big eye look!

Hello there green eyed girls! Or other eye colored beauties! This look looks great with whatever eye color you have and if you are just wanting to use up some green eyeshadow! This look is intense and mystical looking. I had a lot of fun creating this look, and if you want to re-create it on your own eyes keep reading! 🙂

image


As you can see below, this look is made up of different hues and finishes of green eyeshadows. I used a light gold on my brown bone and inner corner of my eye to open my eyes up and make them look bigger and brighter! I then applied dark mossy green color to the inner corner (above the gold) and the out corner then blended the colors out to look smooth and smokey. I glammed up with look with a dab of gold eyeshadow pigment on the ball of my eye, on top of my lid. This is well will give the appearance of larger eyes, because the light will reflect off of your eyelid.

image


Here you can see I added some mascara, but skipped the eyeliner. Eyeliner can take away from all the work you put into your shadows on your lid. Besides, kipping the eyeliner can give your look a fresher appeal and enhance the length of your lashes! Using these green eyeshadows, with darks and lights, can connect with your own green eye shade, and make your eyes look greener! My eyes always jump in the intensity of their color when I use green shadows. I used a white eye crayon, as I usually do, on my bottom water line, this really pushes the look and makes your eyes pop and look huge!

image

I finished the look with my foundation, concealer, and pressed powder to make my skin look pale and flawless. Then I combed my eyebrows and added some matching colored eyeshadow on them in order to fill them in and shape them. I also set them with clear eyebrow gel, which is nice when I don’t want them going anywhere! lol :p I used a red lip liner in a punch color to fill in my lips and then added a clear gloss on top. The light red shade works great for this look, because it is not too bright so it does not compete with the eyes, but the red is a contrasting color of green so they work in a very interesting and pretty combo!

imageIf you guys enjoyed this look, and makeup look for green eyes, or how to make your eyes look bigger with makeup let me know! Please like this post below and support my beauty blog by following! Thank you guys for reading and love always Pearlsnheels ❤ 


Makeup of the Day: Gray Smoke show!

Hello my makeup beauties!  Here is another makeup of the day! This time…it is a smoke show! I love smokey eye makeup, and I was feeling a little edgy today! :0 I decided to go with a more subtle smokey eyes, that updated my makeup look a bit. I feel like no one ever rocks the smokey eye anymore, and it has gotten’ a bit old. Funny thing is, whenever I wear a smokey eye I always get the most comments on my makeup.

wpid-IMG_20130812_183448_399.jpg

wpid-IMG_20130812_183447_134.jpg

You can create this look with four colored shadows. I do not believe it is important to include exactly what products I used, because you can re-create this look with any makeup palettes you have lying around! If you really want to know, I used mostly Wet n’ Wild and Elf eyeshadows. You need one skin toned or white eyeshadow for highlighting your brow bone and inner corner. You need a base medium toned brown. BROWN YOU SAY? Yes! Using a light brown to define your crease, not too intensely though, will mix beautifully with the light cray you apply to the top of your eyelid. Using a bit of soft brown warms up your eye look, and takes away some of the harsh intensity brought with a smokey eye. After applying a shimmery gray all over the to of your lid, follow with a black just to the corner of your eye. You can take this darkest shadow and bring it up and a cat eye shape just as I have done in the picture above.

wpid-IMG_20130812_183312_045.jpg

wpid-IMG_20130812_183314_080.jpg

The key to a successful smokey eye is blending! Grab a fluffy brush and go to town my friends! Using the soft brush, clean up the look using windshield whipper motions and blend out your highlight, crease brown, black outer corner, and gray lid. When there are no more harsh lines left, create a small cat eye with liquid black eyeliner, I used my Revlon one. Then I finished the look by curling my lashes and applying two generous coats of black mascara. If you want to further intensify this look if you are going out somewhere special you can do up your eyebrows, and ass some pink gloss on your lips as I have done! As well tighten your top eyelids with a black coal eyeliner and the bottom outer rim of your eyes.

On my skin I am wearing some Revlon Colorstay Whipped Foundation and my Maybelline Fit Me Pressed Powder.

Seal the whole look in with a facial setting spray and you are good to go for the night! Hope you guys enjoyed my smokey eye, and please like if you want to see more makeup of the day posts! 🙂 Please follow me for more good stuff and leave me some comments with any future post suggestions or makeup looks I could try out and post about! 🙂

Thanks for reading and the support! Love Pearlsnheels ❤

P.S I am thinking of creating a post on how to apply makeup to pale skin, since it has taken’ me a while to get used to mine! lol Let me know if this sounds interesting to you?! 🙂

How To Get Bigger and Brighter appearing eyes? TIPS & TRICKS!

Hello darlings! In this blog post I will help you transform your small droopy, tired looking eyes into big beautiful ones! Unfortunately most people, including myself are born with smaller sized eyes and hooded eyes. My eyes are slightly hooded, so most of the time I have to put in the extra effort with my eyeshadows to make sure not only you can see my eyeshadow, but to make my eyes appear larger.

There are so many ways to achieve a wide eyed look. I know we all see women like Mila Kunis…or Ann Hathaway and are like WHY DO I NOT HAVE DOE EYES THAT CAN MAE YOUR HEART MELT?! Or…At least I do this lol. this is where makeup is a magical tool, it can slim down your face and make it appear to lost ten pounds. Makeup can transform someone from shy and awkward feeling to confident and proud. Makeup can achieve anything is pretty much what I am coming to realize.

wpid-IMG_20130807_171517_595.jpg

You guys can see here that I am rocking a wide eyed look! If you look you can see my highlighted brow bone, and inner corner. You can see the brown eyeshadow swept above my natural crease. I also brought up the arch of my eyebrows. I used minimal eyeliner and extended it past my outer eye. As well I packed on the mascara to create larger, brighter, and bigger eyes!

wpid-IMG_20130807_171519_065.jpg

So if you ever find yourself wishing to have bigger eyeballs, eyelids, or brighter eyes then read on for my tips and tricks!

#1) Use brown eyeshadow. If you have lighter skin, than stick to a brown two shades darker than your own. If you have darker skin use an eyeshadow two shades darker as well. Take the eyeshadow and instead of cutting your crease with it, drag a line following right above your crease. Then blend this line in with a fluffy blending brush. Remember not to use a shimmer eyeshadow, because you want this to look natural. Applying eyeshadow and darkening the skin above your natural crease will give your eyes more dimention, but also give the affect of larger eyes, and a larger eyelid. This is an amazing trick for hooded eyes.

This step can lso be repeated on the lower eye, using a sweep of brown shadow under neath makes your eyes pop out more, just blend off any harsh lines.

#2) Use a Highlight. Using a highlight, as well as brown eyeshadows to contour your eyes can make a huge difference int he appearance of your eyes. Highlight with a slightly shimmered white or tan eyeshadow (depending on your skin tone) and apply a light amount on your brow bone, just under your eyebrow. I like to use a white eye crayon, such as Nyx’s in Milk, and line your waterline, and inner corner of your eye. This extends the white of your eyes and creates the illusion of larger eyeballs.

#3) Raise your brows! If your eyebrows are somewhat close to your eyes, it can make them look smaller on your head. When filling in your brows, create a higher arch and bring your brows up! I am not saying draw on fake looking ones, but with a little bit of lift in your arch, it can make a huge difference. Especially with a highlight under your brow bone, because this will draw light onto your eyes and make them stand out greater.

#4) Black Eyeliner. You can use black eyeliner to tight line your top lid to make your eyelashes seem fuller. As well as applying a thin line of black mascara to your inner corner of your eye and create a wing. Winged eyeliner tends to elongate your eyes. On top of this look you can add false eyelashes which also make your eyes appear larger and have fuller lashes.

#5) For my ladies who are desperate for larger eyes, and don’t mind touching their eyeballs! lol You can purchase contacts to wear daily that have a larger iris than your own natural one. You can purchase these online in many different colors and shades. These will basically make you look like your iris is a lot bigger, and your eyes as well. These are pretty interesting and make a huge different, as well as a lot of girls on Youtube are using them.

Some Don’ts:

-If you want bigger looking eyes don’t completely line around your entire eye with black eyeliner…this actually makes your eyes look closed off and smaller.

-Don’t cover your entire lid in black eyeliner…Most of the time if your eyeliner covers your entire eyelid, then it makes it look like you have barely any eyelid at all.

-Do not use dramatic lipstick. I do in the picture above, but because I felt like wearing red lipstick that day. But if you are looking to create a dramatic wide eyed look then go with some nude lips or light glossy ones, so all the attention stays on your eyes!

Thank you guys so much for reading! If you guys have any comments or tricks on top of the ones I posted above let me know! I would love to hear your ideas! Please remember to like and follow me for some more lovin’. Love always Pearlsnheels ❤

BTW! Check out my new Pinterest Page and follow me please! This is different from my main Pinterest page, because it is primarily only beauty related! 🙂 My page is: Pinterest.com/pearlsnheels

Revlon ColorStay Whipped Foundation Review + Pictures!

Hey guys I thought it would be nice to write this review on a foundation I have been loving recently! I am someone that could buy a million foundations before I am satisfied. I have such a fair skin tone, that is yellow toned not pink, that it is very hard for me to find the perfect shade for my skin. The only foundation that has the greatest selection of shades I have found is the Loreal True Match liquid foundation. This is an amazing foundation, and matches my pasty skin but is too light coverage. My skin is very oily, red patches, acne scars, and pimple prone, so I need the heavy duty kind of stuff! lol

wpid-IMG_20130807_071832_544.jpg

So upon looking for an amazing full coverage foundation, I stumbled upon the Revlon Colorstay Whipped foundation! Everyone here and on Youtube has been raving non stop about this foundation, but I was skeptical. When I went to CVS to check it out, they only had 5 shades. I was very put off and wasn’t sure if it was worth spending $14 on. But thinking about it more I went back to Bed Bath and Beyond, you all know by now I love that place! I used some coupons and got it a little cheaper for $8 on sale. I figured, if it is a total flop I wasn’t spending too much money, and I really wanted to give it a chance.

wpid-IMG_20130807_071819_788.jpg

I purchased the lightest shade they have in 110, and to my surprise it matches my skin tone perfectly. When looking at the product in the jar it first looked too orange and pink toned. But since the foundation is whipped, it blends in with your skin tone perfectly! I was very shocked and happy at the same time! So if they do not carry this foundation is a shade that is light enough for you or dark enough, give the color closest to your skin tone a try! The shades they do provide hoestly can be made to blend in with any color pigmented skin.

wpid-IMG_20130807_071843_148.jpg

wpid-IMG_20130807_072030_119.jpg

The nice thing about this foundation is that it is not heavy, cake, drying, or greasy and it is still definitly full coverage! This is the amazing part, if you have dry skin make sure to use a lotion before hand, and if you are oily then make sure to use a primer and set with a loose powder. I use lotion first thing, then apply primer, then use my flat top kabuki brush from Sonia Kashuk and work the foundation into my skin, then finish with my pressed powder from Maybelline in Fit Me 110.

wpid-IMG_20130807_072006_719.jpg

Most people on Youtube swear by using this product with a beauty blender. Which is great and is a good idea if you have this foundation to try out, if you prefer using beauty blenders. However, since I want my foundation to be very full coverage I prefer to use a foundation brush, instead of losing the product to the sponges when in use.  Especially this foundation brush works really well with the foundaiton, and I picked it up at Target for $15. I just put a q-tip (for sanitary reasons) in the jar and dab little dots all over my face where I need the foundation. Then I go in with the brush and blend the product out. At first if this layer does not cover everything that you hoped it would, you can go back in with a little more product, and the whipped foundation is so light it will not cake up and is very build able!

The long wear factor is incredible. Most products who claim to be 24 hour coverage, most times are a joke to me when I hear it, and do not take these products seriously. Most products claiming to have this kind of lasting power, will last up to 8 hours then melt off or before that time, and look runny by the end of the night, especially with greasier skin. BUT THIS FOUNDATION, holy cow! I was so impressed when I first tried it out, wore it out, never washed it off that night (because I wanted to test its’ true lasting power. I know you are thinking ew…you didn’t wash your makeup off at night? RIght? But, for real when I woke up that morning, after applying it the previous morning at ten o’ clock, my facial foundation looked just as amazing, soft, dewy, and covered as it did when I first applied it.

This foundation because of its’ lasting abilities I would say is amazing for beach days, because it won’t wear off in the high heat, it also remains perfect looking while sweating and working out at the gym. This would be great for a wedding or party, when you don’t want your makeup to go anywhere.

The only cons I will say, to be honest, do not affect my feelings about this foundation much. One con is the packaging. Although I love that it is in a nice high quality glass jar, the heaviness of the product makes it difficult to travel with. The shape of the jar is very bulky and after two weeks the inside of the cap broke, and the jar doesn’t close all the way. If I travel I take a small sample of the foundation now instead of the jar. This would be so much better if it was in a pump bottle, because not only is it heavy and bulky it is also unsanitary when it comes to dipping your brushes or fingers into it during application. This can also lead to it being messy.

Besides those cons, and the lack of shades they carry, all in all, this is one of my favorite foundations easily! I almost like it more than my Kat Von D foundation from Sephora, Because this is so much more easily blended and looks amazing all day and night long. I would definitely recommend this to anyone and for most skin types. This is a great product to have in your collection for days where you want your skin to look flawless, and last a very long time with out having to re-apply.

I hope you guys enjoyed this type of makeup review, if you did please LIKE and remember to FOlLOW me for some more good stuff to come! Thanks you so much for reading, I appreciate the support! Please comment down below with any questions if you are thinking about purchasing this foundation. If you have this foundation and love it, or hate it let me know what your opinion is! I love talking makeup! Love always Pearlsnheels ❤ 

5 Yummy & Healthy Snacks I have been Loving, and Actually Craving!

Hey guys here is a quick post, about some yummy healthy snacks I have been stocking up on lately. I know my blog is predominantly beauty and makeup related, but you gotta’ put good things in to look good on the outside don’t ya’? I enjoy reading other blogs that give healthy living tips, especially when it comes to food, because I am always trying to improve my diet and life style. I enjoy sharing with you guys snacks that I have switched to instead of the all important Doritos and Cream Soda, which i once had a love affair with.

If you guys enjoy these types of healthy, food related posts, then let me know and I will continue on posting them! Maybe even some of my workout routine regime I have recently got into, and have lost some poundage with!

#1) Plantain Chips, more importantly Garlic Flavored. I love potato chips, so anything that can tear me away form them for good is an angel sent from heaven in a brightly colored bag. Small miracles people. These things do not taste as you would expect them to for plantain chips. They have simple ingredients, are healthy or you, and taste way better than anything that contain practically 500 calories in 4 chips, like most Lays do.

Unknown

#2) Dasani Flavored Water Drops. The one I picked up is the tropical flavored one, and it is incredible! I used to be one of those people who drank water every other week, when forced. I am like AINT NO BODY GOT TIME FO’ DAT’! I want flavor baby! I have found it, although when you squirt it into a water bottle it literally looks like you are on Survivor and drinking your own urine to survive, but it tastes amazing, just like pina colata water! It is so good I will drink 5 water bottles a day now, and can tolerate the taste of plain water, just because I am so used to it now 🙂

0004900000505_500X500

#3) Special K Chocolate Cereal. Yup, chocolate. WOOP THERE IT IS! I am a chocolate fiend, and anything that curves my need for it, I am all for. This cereal tastes so good, and fills you up. It is a tasty thing to have before work or school in the morning, and let you enjoy a healthier breakfast cereal than pancakes or Captain Crunch.

Unknown-1

#4) Bags of mixed Veggies. Veggies to me sounds a bit icky and too healthy, yes, yes. But, when you get these variety packs, which they have a bunch of different kinds, you get to choose which veggies you like add some Ranch and have at it! I love raw broccoli and cauliflower with a bit of light Ranch dressing, Delicioso Dora!

org_saltray_vegmed

#5) Humus and Pretzel Thins. Again, salt and chip like things make me go wild so when I saw these cute little travel sized portions of humus and pretzel thins I needed to try them. I love when you can get your hands on healthy snacks that are easy to throw in your purse or backpack that make it easy to be diet friendly and on the run. Instead of having a low point in the day, when you go to Subway and get a CHicken Parmesan Sub..In footlong length, and then sit there afterwards and wonder WHY?!

Unknown-2

Let me guys know if you enjoy reading these kinds of posts, I hope this one was helpful for you! Also, comment down below with what your favorite healthy snack is so I can add some to my snacking inventory!

Thank you guys for reading and love always Pearlsnheels ❤

Makeup of the day! Bold Eyebrows, Eyeliner, & Glossy Lips….HOW TO.

Hey guys, here is another makeup of the day for you! This one…I admit it is pretty intense..but if you would like to re-create it please show me, I would love to see what you guys come up with! I had a lot of fun creating this, I didn’t have any certain inspiration, I mixed a combination of makeup inspired by Mila Kunis,  Amy Winehouse, and Angelina Jolie! Of course, I am not lucky enough to look like any of these, but I combined the effect that their makeup has;  Angelina’s big lips, Mila’s big open eyes, and Amy’s bold cat eye. I am really happy with how it came out…and to be honest took me an hour :p Is that a normal amount of time for makeup? I decided to have bold eyes, mild lips, and skip out on the bronzer and blush, to keep from looking like I am about to join the circus.

This makeup look is built up of layers. I believe that when you layer each shadow and lip shade with a soft hand that the end result is very smokey and light, in stead of one bold shade per feature. The only bronzer I used was to lightly contour my nose, because it is the only feature that makes me self conscious, for I have a very wide-bridged nose 😦 ha ha, but we all have our nit picks :p

image

If you are interested in the products I used in this look and how to create it, I will list it all below:

The Balm Meet Matt(e) Eyeshadow on my brows! Yes, eye shadow, I have literally tried every brow kit in the world and none of them match the color of my brows! I got a little sample size of this in one of my Ipsy bags! Like this post if you love your monthly bag! And, I became addicted to it, I am definitely going to re-purchase the full eyeshadow when I run out just to use on my eyebrows! I usually apply it with the Elf Angled Studio Brush, it is really dense and perfect for angling your brows! Then I set them with the Elf clear Eyebrow gel.

wpid-IMG_20130731_155814_334.jpg

I used, Mica Cosmetics Black Gel Eyeliner, I also got in an Ipsy bag! Can you tell I am trying to use some sample products up? lol I wet my Elf angled eyeliner brush then dipped it in the gel eyeliner then drew a line up almost to the end of my eyebrow (this is how you will achieve the perfect angled cat eye for the shape of your eyes!) Let me know if you want an eyebrow tutorial as well, I will make a post, pic by pic.

I made me eyes look bigger and brighter by cutting my crease with some brown eyeshadow, you can use any kind! Then blend it out, giving your eyes the smoky look. Then use a highlighting shade, any light tans, whites, or creams will work and pop it onto your brow bone, just under your brow, the corner of your inner eye, and the very middle of you eye lid. If you have some what hooded eyelids like I do, then put your brown crease color somewhat a bit above your natural crease, and then use the brown and shade in a little bit below your natural under eye. This will make your eyes appear much larger, and open!

wpid-IMG_20130731_154347_487.jpg

wpid-IMG_20130731_154346_089.jpg

Then I used my absolutely favorite mascara, I am sure you guys are sick of this but…My Jordana Best Lash Extreme. I will never love another mascara as much as this one, if you want to read my whole blog post about it check for the link below! I applied two generous coats of this on top of my curled lashes. You can also add some falsies if your lashes aren’t very full, or if you are going out clubbing or what not. Then I used my L.A Colors Eye Crayon in Sea Shells on my waterline to make it look like my eyeballs are larger, which is a great dupe for NYX eye crayon in milk, and in my opinion works better and is cheaper!

I used a bit of the same black gel liner on my lower eye lid, but instead of using it to round line my eyes, I dragged the line out in a 130 degree angle, which made my eyes look more cat like.

On my lips, I outlined them with Jordana Lip Liner in Silver Lilac, and drew up a crease in the center of my bottom lip to give the Angelina split lip affect. Then I covered my lips with a bit of nude gloss, and finished them off the some highlighting powder on the middle of each lip, and a bit of highlighter on my cupids bow, this will make the lips appear fuller.

I finished this look off with my foundation. I find it easier to apply my eye makeup first, then my foundation, because if the eye makeup applying process leaves any fallout or smudging, it is easy to clean away then do my foundation rather than try to clean up my eyes after wards.

wpid-IMG_20130731_155233_947.jpg

I used Revlon 110 Color Stay Whipped foundation blended out on my skin with my Sonia Kashuk foundation brush, and covered any blemishes and my under eye circled with my Elf Corrective Concealer in yellow.  Lastly, I set my foundation with my favorite facial powder (Maybelline Fit Me Pressed Powder in 110) and my Elf Finishing Spray so my makeup doesn’t crawl away over the night :p

If you guys like this look and would like to see more makeup looks in the future please like this post 🙂 Also follow me for more good stuff! Comment down below, with any comments on this look, suggestions for future posts, or just to say hello 🙂 Thank you so much for reading, and love always Pearlsnheels ❤

P.S, You can also check out my Instagram in the side bar to the right, and follow me to see each of my makeup looks everyday!

Makeup Look Of The Day! Sparkly Eyes? But Not Look Like A Clown!

Hello darlings! I am back with a sparkly makeup tutorial! I woke up and felt like I wanted to rock a princess look lol. Here is a way I decided to wear sparkles nut not look like one of Beyonce’s backup dancers. The best way to pull off this look and not using too many sparkles, using a glitter liner not a loose pigment, and keeping the rest of the makeup on your face neutral. I used Sephora brand Glitter Liner, it is surprisingly cheap I think it was about $10, and it is incredible! It stays on all day, but isn’t a pain in the butt to take off later in the night. Also, use the glitter liner only in the inner corner of your eye. This is where you want the lightest makeup anyway, and light to be draw. This will open up your eyes, and make them look brighter. I used a silver and white flecked glitter as well on top of purple eyeshadow.image

The best way to use the glitter is over a base eyeshadow that complements your eyes color; my eyes are green so I sued purple. Using a glitter liner as a pose to a loose pigment is best, because loose pigments tend to leave fallout uner your eyes, makeing you look like you got barfed on by Krista from Fern Gully. Anyone remember that movie from their childhood? It is good aswell to keep your eyesbrows, cheeks, and lips clean and some what neautral if this is an everyday look, because it will bring attention to your eyes. If you paired this with a bold lip, and cheeks full of rouge, then you might look like a clown ging off to work. Keep the eyes bright and the rest simple, I only have some light eyebrow makeup and a clear gloss on my lips.

image

I also applied some purple eye shadow under my eye to unify the whole look with the purple eye shadow on top. The purple eyeshadow I used is from my Elf mini eyeshadow quad in SIlver Lining, pretty good pigment for only $1! Like if you love buying Elf’s essential brand makeup! I used my favorite mascara, Jordana Best lash extreme on my lashes, and skipped the eye liner for today, because I didn’t want to cover the eyeshadow and glitter, it would have only taken away from the look.

image

As you can see there is not a lot of glitter, it is only in the inner section of my eye lid, this look was simple and quick to do! If you try it out please post some pictures and let me know how it turned out! 🙂 Thank you guys so much for the support and reading my blog, if you enjoyed this look please click the like button, and follow my blog! There will be more makeup looks to come so please stay tuned. Love always Pearlsnheels ❤ 

Magazine Makeup Look #2

Hello There! So sorry guys I have been MIA for the past week I was on vacation in Maine! I will be sure to get back into the swing of things, and start blogging regularly! So please stay tuned! 🙂 Flipping through a magazine on my trip, I found this makeup look on this woman and was very impressed! I have never used this before but it looks interesting to me and easy to use, It is the Maybelline Master Smokey Long wear Shadow Stick! I am always looking into magazines, watching out for new upcoming makeup to try, at least on the drugstore end of things lol I love running down to CVS and picking up something I saw in Cosmo or on TV. Ha ha can’t we all relate to makeup impulse buying? I would love to try this out and maybe post a look I create with it, and a small review. If you guys have tried this out let me know what you think about it, and if it is worth my time and money to test out 🙂 If you want to check out my magazine makeup look numero uno check in the links below, and follow me for some more lovin’ and remember to like this post! 🙂

wpid-IMG_20130716_120846_387.jpg

Here is the picture the add showed of the product, and I thought her eyes look incredible! I love a sexy smokey eye and would love it to be made as easy as a shadow stick that you smoke out. As a pose to loose black eyeshadow fallout on my cheeks and raccoon eyes! lol

wpid-IMG_20130716_120859_353.jpg

Thanks always for reading, Love Pearlsnheels ❤ 

Nail Look Of The Day #1! Black & Glitter

Nails! I will be creating some posts with nail looks I create! I have since been inspired by my fellow bloggers, and their gorgeous nails! So, here is my first look is showcasing black and glitter. I am all about the flash! This look wasn’t hard to complete at all. The only challenges were found in painting my right hand with my left, this is one of my biggest life issues ha ha FIRST WORLD PROBLEMS…But I will just show you what my left hand looks like, because it doesn’t look like my right hand at all! lol

I used, of course, a base coat, a fast drive top coat, black skinny brush nail polish, and some glitter!

wpid-IMG_20130716_115622_243.jpg

I used Spoiled Nail Polish In Jewelry Heist, for the glittery tips! I used Nail Club Black polish with a skinny brush. Then, my favorite top coat, Oh So Wet! This stuff is a fast drying top coat, that literally dries before your eyes and prevents chipping.

All I did to create this look was first apply my base coat, any one will do! Then I turned my hand sideways, to make this step easier, and dragged the tip of the brush along the edge of my nail, applying a thick band of glitter at the end of my finger nails. Then I repeated this step three times, ensuring an opaque glitter effect. Then after that was all dried, I took the black skinny nail polish brush and flicked diagonal lines from the side of my nails to the center, starting thick then tapering off. This took me a couple nails before I got the hang of it so don’t worry if the lines waver a bit, hay it beats salon prices! :p I put these lines above the glitter band on my nails, and gave the look a professional touch 🙂

wpid-IMG_20130716_111704.jpg

Thank you guys so much for reading, please comment down below with ideas for future nail looks I can create for you! Or let me know if you like these types of nail posts and I will be sure to create some more. Please remember to like this post and follow me for some more lovin’ 🙂 Love always Pearlsnheels ❤

Shopping trip! Wanna’ see what I got? Random haul

Ello! This is sort of a random shopping haul, but it all started from me doing what I always do when I got to a place like Target, Walmart, or Bed Bath and Beyond…I say “Oh I am just running in to pick up one thing..” $50 later…Ha ha, does that ever happen to you guys? I find myself mindlessly trolling the makeup, hair, and clothes sections and by the time that I am done I have checked out with way more than I ever intended to buy!

This, was definitely one of those trips! Here are just some of the products that I picked up from mostly Bed Bath and Beyond and One from Target. It is funny, you wouldn’t think Bed Bath and Beyond would have amazing beauty products for the cheapest I have found, including Walmart, but it really does! I love that store, and they always have what I am looking for, for a good price, and give you a ton of coupons!

Here are the things that I picked up form there, they are random, but all things I needed or wanted to try out!

Let me know if you guys would like a review of any of these products, or if you have already tried them what you think of them, are they good or bad?

image

wpid-IMG_20130716_115435_617.jpg

Firstly, I picked up this Nail Repair Nail polish. I picked this up because, without acrylics I am always growing my nails out nice and long then they catch on something and painfully rip half way through the nail! And I basically consider crying myself to sleep because it is like DO I CUT THE NAIL? DO I WAIT FOR IT TO CATCH AGAIN AND END MY DAYS?! Finally, I have found something to aid my nail suffering, wish me luck!

On the right is the Sudden CHange under eye firming serum. I know, I know I am not no 70 years of age, and am only 20, but hay sometimes I get some nasty under eye bags so girls gotta try somethin’!  Apparently from reading the packaging you dab some of this magic under your eyes (onto the bags) and they instantly firm up and look like your young again! Hmmm…certainly caught my interest!

image

image

Here I have some Whitening Listerine mouth wash, pretty boring I know…But I LOVE COFEE, and there is no way of avoiding it or the stains it leaves on my pearly whites. SO maybe this will be the answer to my prayers, or maybe I will not last a minute and spit this gross tasting concoction into the sink after 6 second.

On the right, are two products The SImple brand eye makeup remover, and the Trader Joe’s Tea Tree Tingle Shampoo.  I, admit I have already tried the Simple brand makeup remover, and at first I was like WT*. I though I had waisted my money, this was the only product I picked up from Target, and was so excited to try out. I even got the idea form a fellow blogger, and when I first used it, I was basically ready to return it. Little did I know I was not using it to the best of its’ abilities. At first I used it by squirting some onto a tissue, then toilet paper and trying to wipe away a night of smeared mascara and eyeliner. BIG NO NO, there was some eyelashes lost that day 😥 And it did nothing but cause pain, irritation, and money lost. But, I had an epiphany and tried it on a cotton ball! Whew baby, momma knows! You just have to soak a cotton ball, not pad, and gently let it sit on your eye for a couple of seconds then work the makeup off slowly in a massaging motion. It looks as if I had virgin skin never touched by makeup before in its’ life. This stuff has changed my makeup removing routine, and I am very thankful that I gave it another chance!

As for the shampoo, I am really excited to try this one out, it was also suggested to me! Mint or tingling shampoos are said to cause scalp follicle stimulation, thus producing faster hair growth, who knows? It was only three dollars at Trader Joe’s, so I figure if it does nothing it is not a total loss! I like that the shampoo is cheap, accessible, is natural (no sulphates or parobens), and is a decent sized product amaount. The shampoo doesn’t have that harsh tea tree smell, it smells more like minty tooth paste, and actually smells very fresh and clean! I am excited to see how I make out with it.

image

image


Here is two shots of the one jar of Revlon Color Stay whipped Foundation, in 110 Ivory. This is the lightest shade they had which I was sad about, because I am so fair I basically need Bella Swan Vampire White in order for the makeup to match my skin tone. This caught my eye, it was only $10 which it usually can get up to $14 at other places I have seen it sold, and I used a coupon!  I was interested in trying this foundation out because of all the rave reviews I watched about this on Youtube. if you guys have tried this, give me a shout out and let me know if it is magic in a jar or a total fail on Revlon’s part.

wpid-IMG_20130716_115504_287.jpg

wpid-IMG_20130716_115453_034.jpg


Next, I have the Johnsons’ Baby Oil. No I do not have an infant, but someone once told me that if you drag a bit of this in the center of your leg, starting from your thigh down to your ankle, it will elongate your leg and add a slimming effect. Pretty cool, right? Maybe I will just look like my legs could grease a pan but we will see!

On the right I have some Cetaphil Moisturizing Lotion. I got this in the travel/sample size, because my current facial lotion (Nutrogena Oil Free Facial Lotion) has ran out, and I was not totally happy with it. That facial moisturizer actually made my skin oilier! Like so oily you could see my cheek shine from out in space. So once it ran out I decided to switch my game up and try the all so bragged about Cetaiphil. Hopefully this will be my dream product and moisturize my skin, but not leave it dripping with oil.

wpid-IMG_20130716_115446_817.jpg

wpid-IMG_20130716_115427_749.jpg


The next two are very random products. The one on the left, obviously a mini spray bottle. A PINK ONE. Since it is summer again, and I love scrunching my hair, but never have a spray bottle, and end up putting my head under the sink, I thought this was something essential to have, for scrunching my hair and sleek Kim Kardashian wanna-be high pony tails.

On the right is Palmer’s Cocoa Butter for stretch marks on Prego ladies. Let’s just say MR. PALMER not only do pregnant women have stretch marks. I have some from, yo-yoing my weight, growing, ect. Needless to say, I have some battle wounds that I would like to work on getting rid of and have heard amazing things about this from my sister, who is actually pregnant and working to prevent tiger scratches on her baby bump! The smell is very pungent with cocoa, but hay smells like it is going to work! Fingers crossed!….and toes, and eyes! :0

wpid-IMG_20130716_115356_344.jpg

Lastly, I just have some boring hair clips. But, hay! I told you this was a random haul, and I just thought these little guys are so cute; sparkly ones, lace, and metalic. These will be great on no wash hair days, and when I don’t feel like dealing with my strands and just want to throw them back in a simple up  do.

If you enjoy seeing my random haul posts then please like this, and follow me for some more good stuff! Thank you guys so much for reading, and love always Pearlsnheels ❤

My favorite Perfumes! Mhhhh…

I do not know about all of you…But when it comes to perfumes, body sprays, and scents I just can’t get enough! I love sweet candy smells, musky smells, and even sometimes just the scent of my car when I am gassing my Nissan lol So here it is, my list of current favorite perfumes. Some of these are older and newer, and some I just can’t live without even if they are old and forgotten. Please let me know if the comments which perfume is your favorite? Or is you like one from my list! 🙂 Or maybe something I should try out?

#1) Fantasy By Brittany Spears…This is one of those forgotten ones I was talking about. I will always love the sweet smell and it is my boyfriend’s favorite.

wpid-IMG_20130716_120220_803.jpg

#2) Vera Wang  Rock Princess, smells more of musk, and is sexy 😉

wpid-IMG_20130716_120208_192.jpg

#3) Gucci Rush 2….They don’t even make this anymore, and I pay extra to get my hands on it! This bottle’s scent smells so classy and divine! I love the square packaging as well!

wpid-IMG_20130716_120155_450.jpg


#4) Gucci Guilty…Yes another Gucci perfume, but if you buy them off of Ebay, Perfume Mania, or Sephora they aren’t too pricey :0 I received this for my birthday, and it was one of the best gifts ever! It is pretty expensive, so I literally use a spray a month. But oh my gosh do I love the smell. I used to go into Sephora just to spray myself all over and leave lol Amazing!

wpid-IMG_20130716_120202_807.jpg

Thank you guys so much for reading, and I hoped you enjoyed my favorite perfumes! 🙂 Love always Pearlsnheels ❤

Yummy Snack! Only 270 Calories for some CHEESY DELICIOUSNESS!


Hey guys! Looking for a delicious way to spice up your snack selection, but don’t want to blow four hundred calories on it? Here is a lighter snack, that is full of flavor! Sorry to all my lactose intolerant friends, this recipe is not friendly to you 😦 I tried out this snack, and it only took me two minutes to put together, I mean how hard is it to whip together nachos? You can alter these little guys by adding sliced tomatoes, maybe some light ground beef, and salsa if you wish! I figured I would go the simple route, I used Tostitos Multigrain Scoops, Light Shaws brand Sour Cream, Cabot Reduced fat shredded cheddar, and one Sargento Reduced Fat Cheese stick.

I just laid out 13 multigrain chips, filled them with the shredded cheddar, then sliced up the cheese stick in to disks and put them in the center of the scoop. I placed them in the Microwave, you could substitute this with the oven but ain’t nobody got time to preheat, and let them cook for 30 seconds. When they were bubbling I took them out and put a dollop of light whipped cream on top. Trust me these little beauties taste amazing!

If you guys like food posts or recipes please let me know! I can post some healthy dinner recipes and write how to make them with pictures! 

image

Thank you so much for reading, please remember to like and follow me for more loving! Love Pearlsnheels ❤


WHAT’S IN THE JULY 2013 IPSY BAG?! Open ME!

Hey Ladies! It is finally here! The moment we all have been waiting for…the Ipsy bag for July 2013! I have been especially excited for this bag, as you could tell from all my sneak peek posts! I was sad to see that I did not get the Benetint, but I am really happy with everything else I received, below I will have a couple pictures showing you guys a makeup look with the eyeshadow palette and the lip crayon, so please keep reading 🙂 I will also list all the items, and pictures of the products I got in my bag this month. As well, I have already tried all of them out and will give a little bit of review on the products! Please comment down below and let me know Thanks so much for reading, and love always Pearlsnheels ❤

Here is the bag all the goodies come in! So adorable, and it can actually fit a lot of makeup! I like how it is also plastic, because it will be so easy to clean!

Here is the bag all the goodies come in! So adorable, and it can actually fit a lot of makeup! I like how it is also plastic, because it will be so easy to clean!

Here is the cute little card inside saying "Beach Beauty" and on the back it describes all the products that came in my bag!

Here is the cute little card inside saying “Beach Beauty” and on the back it describes all the products that came in my bag!

I love getting hair products in the monthly bag! I get so excited to try them out! I tried this out a little on my dry hair, which wasn't very effective, just gave me a little bit of texture. I think the best way to use this is when your hair is wet and you scrunch the product into your hair...If you guys have used this on wet hair, let me know how your experience with it went! This product smells amazing, and seems like an oil based hair serum, I am interested to see how it will come out and if it is a good dupe for the Bumble and Bumble kind!

I love getting hair products in the monthly bag! I get so excited to try them out! I tried this out a little on my dry hair, which wasn’t very effective, just gave me a little bit of texture. I think the best way to use this is when your hair is wet and you scrunch the product into your hair…If you guys have used this on wet hair, let me know how your experience with it went! This product smells amazing, and seems like an oil based hair serum, I am interested to see how it will come out and if it is a good dupe for the Bumble and Bumble kind!

Unfortunately, I did not receive the Benefit Benetint. But instead, I received the Salt Air Roll On Perfume. I would have liked to get the Benetint, because I love Benefit products, but I am happy with this sample too! The sample size is great for a perfume, and it is nice to try out because it is a sent I would not usually pick, but smells pretty good. The smell is light and fresh, but the consistency is a little bit greasy. If you want an airy clean smell this is nice to tab on the wrists and behind your ears.

Unfortunately, I did not receive the Benefit Benetint. But instead, I received the Salt Air Roll On Perfume. I would have liked to get the Benetint, because I love Benefit products, but I am happy with this sample too! The sample size is great for a perfume, and it is nice to try out because it is a sent I would not usually pick, but smells pretty good. The smell is light and fresh, but the consistency is a little bit greasy. If you want an airy clean smell this is nice to tab on the wrists and behind your ears.

The first product I have in my bag is the Coola SPF Mineral Sunscreen. It is a pretty small sample, but at least it is unscented so it does not smell like a gross sunscreen scent. I tried out a little bit on my face, before I applied my foundation. The consistency is creamy and non greasy.

The first product I have in my bag is the Coola SPF Mineral Sunscreen. It is a pretty small sample, but at least it is unscented so it does not smell like a gross sunscreen scent. I tried out a little bit on my face, before I applied my foundation. The consistency is creamy and non greasy.

BH Cosmetics Eyeshadow Palette in California Collection Do they make more collections like this? If so, I will take all of them please!

BH Cosmetics Eyeshadow Palette in California Collection
Do they make more collections like this? If so, I will take all of them please!

Yes! Eyeshadow palette woop woop! I love eyeshadows, and the fact that we got three as one product is amazing, especially since they have counted one little eyeshadow as a whole product before! On top of all that the colors here are amazing! I used the Malibu and San Francisco for a makeup look yesterday on my eyes, as seen in the pictures below! I am excited to use the hollywood, I will probably use it for a pop of color under neath my eyes. They are all really well pigmented and full of shimmer! The gold and metallic brown are beautiful for summer looks, but could easily be used with the purple for a night time as well. What can I say, I am very excited about this product. Well done Ipsters.

Yes! Eyeshadow palette woop woop! I love eyeshadows, and the fact that we got three as one product is amazing, especially since they have counted one little eyeshadow as a whole product before! On top of all that the colors here are amazing! I used the Malibu and San Francisco for a makeup look yesterday on my eyes, as seen in the pictures below! I am excited to use the hollywood, I will probably use it for a pop of color under neath my eyes. They are all really well pigmented and full of shimmer! The gold and metallic brown are beautiful for summer looks, but could easily be used with the purple for a night time as well. What can I say, I am very excited about this product. Well done Ipsters.

I was excited to receive the Pop Lip Crayon in "Coral Crush" I put this on my lips yesterday and fell in love with it! The color is buildable, and feels very smooth on my lips. The texture isn't sticky or greasy it is perfect with a little bit of lip balm under neath it.

I was excited to receive the Pop Lip Crayon in “Coral Crush” I put this on my lips yesterday and fell in love with it! The color is buildable, and feels very smooth on my lips. The texture isn’t sticky or greasy it is perfect with a little bit of lip balm under neath it. I am wearing this on my lips in the makeup look below!

Thanks you so much for reading!

Remember to Like this post & Follow me for some more cool stuff daily!

xoxo

image

image

image

image

Eyes. Lips. Face Haul!

Hey there loves! I places an order in the mail, and received my elf makeup in the mail yesterday! When I placed the order, I used a 50 percent off code on the summer essentials and got an amazing deal! I love Elf cosmetics, it is all so cheap and a lot of them are my go to makeup products!  If you guys would like any reviews on the products I bought let me know 🙂 If so I will be sure to make a post about it. Also, let me know if you have tried any of these products, and what you think about them! Thanks so much for reading and love always Pearlsnheels ❤

Here’s What I got:

Essentials Eyeliner brush- I will probably end up using this for my brows!
image

Studio Baked Bronzer in St. Lucia & Studio Angled Blush Brush-I will probably just use these two together for some contouring! image

Essentials Cover Everything Corrector in Corrective Yellow & Essentials Lip Bam Tint in Peach- I’m gonna try this concealer on my under eyes and dark circles!

image

Studio Makeup Mist & Set and Studio Tinted Moisturizer SPF 20 in Porcelain-The mist & set is a repurchase for me, I love this stuff! I have already swatched the moisturizer and let’s just say it is pure umpa lumpa orange and definitely NOT porcelain 😦

image

Essentials Eyelash & Brow Wand and Wet Gloss Lash & Brow Clear Mascara- I needed one of these combs for my brows so badly! I also wanted to try this clear mascara for them to be a cheap replacement for my Chella one!

image

Studio Lotion Wipes in Vanilla & Coconut and Cucumber & Melon- I am super interested in testing these out and seeing how the scent lasts!

image

Essentials Palette 32 Color Piece in Jet Setter- This palette loks amazing it has every color I could need! It also comes with a free eyeshadow brush! image

What’s In My Beach Bag?

Hey loves, I thought this would be a fun post to write for you guys! I am going to the beach tomorrow and Started packing my bag and thought why not show you what I am bringing 🙂 If you guys would like to read a what’s in my purse or makeup bag post please let me know below in the comments 🙂 thank you so much for reading, please remember to like and follow, Love always Pearlsnheels ❤

image

Here is my trucker hat from Pacsun. There is nothing worse then a burnt scalp! :0 And I look BA in it!image

My Bathing suit, I fell in love with this mismatched patterns, and guess what? I got it so cheap from sears!

image

Staying hydrated is a must! I use my plastic jeweled cup from Marshalls, love this thing! I also have here my Jergens Natural Glow Face lotion with SPF 20, so my face doesn’t burn!

wpid-IMG_20130709_245907_548.jpg

Here I have my Favorite book Gathering Blue by Lois Lowry, read it! I also have a Lucky Magazine in case I get board and want to ketch up on fashion :pimage

Here I have a little sketch book and pen! I love to draw and the beach is especially inspiring to me! image

Here, I always carry with me , my favorite powder: Maybelline Fit Me Powder and Elf powder brush incase I need to apply some touch ups. Since it is hot at the beach bringing these Elf oil blotting sheets is a must!

image

Here I have my navy blue flip flops from Old Navy, cheap sandals are the best for the beach because it is ok if they get dirty and wet. Also, some bobby pins to throw back my hair, and SPF Chapstick!

image

Here I have a colorful scrunchy, also to throw back my hair in a bun, and some Deodorant! No body wants to smell all hot and yucki’ at the beach! image

Yes, I have Tattoo Goo in my beach bag! Tattoo Goo is amazing and hydrates and protects your tattoos! On the other hand the sun can damage and fade it, so I bring this a long with me to keep my ink healthy!

image

Most importantly sunscreen! Noboby wants their skin to look like a leather handbag! I use Coppertone Sport SPF 50, this spray on stuff is amazing! Although I will say I miss using that purple lotion stuff I loved when I was a kid! I also bring some amazing hand lotion, this is from Bath & Body, It Is the True Blue Shea Cashmere Hand lotion, smells amazing and keeps my hands so soft.

wpid-IMG_20130709_243347_906.jpg

Of course a colorful beach towel, to dry off with! Or rap myself up like a penguin :p

wpid-IMG_20130709_243244_179.jpg

 A beach matt, to lay down under me. No like likes sand in their buns! :0

image

Protect your corneas! I use my pink Guess aviators!


Thanks so much for reading guys, Love you all. Please remember to follow, comment and subscribe! 🙂

Makeup For Green Eyes #2


Hey there loves! Here is another green eye makeup look! Here is a more dark and edgy look than the first! It was easy to create, and you can use any makeup products you have lying around! When I finished the look it sort of reminded of a version of the makeup the girl from Pitch Perfect wears. This is a fun and kind of vampy look! If you have any questions about the products I used, feel free to ask. I hope you guys enjoy and please like this post and follow me if you do 🙂 Thanks so much for reading and love always Pearlsnheels ❤image

I also have a light purple lipstick on my lips! To unify the makeup look with the eyes! image

As you can see, this look really intensifies the look of my green eyes. I used a black liquid eyeliner on my top lid, with a pretty heavy application. Then I used a purple eyeliner and smudged it out on my under eye area. I finished the look with an eyelash curler and black mascara.

imagePlease leave me any suggestions for more makeup looks, I would love to read your feedback 🙂 Thanks xoxo

Makeup For Green Eyes #1


Hey there darlings! Here is another makeup look for you guys, but this time for green eyes! Even if you guys don’t have green eyes, this makeup look is easy and comes out really nice for a summer day 🙂 I will list the makeup products down below that I used to create this eye look. If you guys have any suggestions for more makeup looks I can create for you, please let me know in the comments 🙂 Thank you so much for reading and Love always Pearlsnheels ❤ 

image

As you can see int he picture above, This look is pretty dramatic, and makes your eyes pop!


wpid-IMG_20130705_175555_007_20130708024324907.jpg


I created this look with The gold and green shimmer eye crayon from L.A Colors in the inner corner of my eye, and make it look brighter.

I have a brown eyeliner on my waterline to accentuate the green in my eyes, and on top of my lids.

image

Here is the palette I used for my eyeshadow above, and below my lid: Wet N’ Wild in Comfort Zone. I love this palette it is cheap but well pigmented! image

This is what is on my lips, it is the Liplicious sheer lipgloss in Cherry Vanilla. It is from bath and body, they seriously have the best lip glosses ever, this one tastes like cotton candy exactly but isn’t sticky! image

Here are the brushes I used, my trusty Elf Makeup and crease brushes, eye primer, and eyelash curler.image

I finished off the look with my favorite mascara of all time Jordana Best Lash Extreme Mascara in Black on my upper and lower eyelashes. image

If you like this look please let me know, I would love some feedback 🙂 Please follow me and like this post, and stayed tuned for more! 🙂

xoxo

How To Get White Teeth + Products I Use

image

Hello there darlings! Here is what I use to have and maintain a white smile! My teeth are a little crooked and what not, but we all aren’t blessed with perfect teeth. I lately have been working hard to whiten them, so I figured I would share what I have been doing and using lately! 🙂

Some other tips for white teeth and overall good oral health:

  • Remember coffee, blueberries, and wine will stain your pearly whites! :0
  • Drink through a straw to avoid as harsh staining
  • Always brush your tongue and lips to ensure good smelling breath and flake free lips!
  • Visit your dentist 🙂
  • Be kind to your teeth, they are sensitive and once you loose your enamel, it is gone forever. Trust me I know, I smashed my face on a jungle gym when a child and now my right front tooth in the picture above is fake!
  • Don’t brush right after eating a meal….Strangely enough this can cause cavities! If you eat something sugary the sugar can sit on your teeth then be ground in with a toothbrush. Wait at least an hour after eating, then brush you teeth, because the sugar will have been dissolved already.
  • Mouth wash is a great way to kill extra bacteria and leave you with fresh breath
  • Got painful wisdom teeth? I know how you feel I had all mine taken out at once. It is better to do so than not! If you have four molars pushing in to your mouth and can permanently push your teeth together and cause them to overlap, get crooked, and be deformed. Also can cause rotting! 😮
  • Eating an apple can be a great way to floss your teeth!
  • If you can’t afford a tooth whitener, most are filled with peroxide. Yup! That’s right, the stuff in a brown bottle from under neath your b room sink that burns your cuts! You can, and safely, wish this around your mouth and spit out for the same and inexpensive effect as Crest strips and tooth whitening gel!

If you guys have enjoyed my post please let me know by liking and following me for some more lovin’ 🙂 Comment down below and tell me how you take care of your smile! 🙂 Thanks for reading and love always Pearlsnheels ❤

image

A good Toothbrush is major. Mine is in a little piggy head! :0 It is a Colgate 360 Floss TIp Toothbrush!

image

To Whiten, I use and adore Arm and Hammer Whitening Booster Gel that you can just add a little bit to your brush when brushing your teeth to whiten them. I also use Plus White 5 Minute Whitening Gel. This stuff is amazing, you apply it just for 5 minutes and it instantly whitens my smile and removes any staining!

image

A good tooth paste always helps! I use Crest Complete with Extra Whitening

image

To keep my teeth free of tarter build up and looking beautiful I use Oral B Glide Floss

Marilyn Monroe Inspired Makeup

Hey ladies! I am back with another makeup look. Today I was feeling a little vintage and decided to go for a Marilyn Monroe Inspired makeup look. I studied and looked up many photographs taken of Marilyn and put together this look. She always wears a very classic red lip, with bright white eyes. Her makeup is always classic, bold, and romantic. If you guys like my look or have any suggestions for future makeup posts please leave me a comment down below! Thanks for reading and love always Pearlsnheels ❤ 

portraits_12

wpid-IMG_20130704_151713_355_20130705015535381_20130705021019552.jpg

Here’s The Products I Used, Incase You Want To Re-create it 🙂

  • Be A Bombshell Lipgloss in Hot Mess on my lips
  • Boots No7 in 10 New Ivory for foundation
  • Jordana Best Lash Extreme Mascara in Black on my lashes
  • L.A Colors Eye crayon in Sea Shell on my waterline
  • Maybelline Fit Me Pressed Powder in 110
  • Meet Matt eyeshadow on my brows
  • Some black eyeliner, white eyebrow highlight, and some light brown eyeshadow in your crease

wpid-IMG_20130704_151916_633_20130705020150788_20130705021052175.jpg

wpid-IMG_20130704_153204_975_20130705015906836_20130705020857031.jpg

Makeup of The Day! Trying Out The Loreal Shimmer Mascara

Hello lovies, so in one of my lasts post I had a mini haul, you can check it out in the links below. In that haul, I bought the Loreal Paris 440 Black Quarts Double Extend Eye Illuminator. At first, I will admit I was a bit disappointed with the mascara, I didn’t think it did anything for my lashes or made them very shimmery. But then I read the packaging, and of course I was using it wrong! Derp! The packaging says you apply the black mascara end first, then when it dries add the sparkly end to your lashes on top of the black coat. Before I just used the sparkly end lol. So I grabbed my makeup remover and washed away the mascara and tried again! Finally, TA DA somewhat sparkly lashes.

image

image

It isn’t a crazy amount of shimmer, but that’s is kind of a good thing if I want to go out with a little extra something special and not looking like Lady Ga Ga on concert day. The mascara comes in a bunch of different shades, ones for blue, green, brown eyes, ect. I bought the brown eyes formula, even though I have green eyes, because I thought the color on this one was just so pretty!

image
After I applied the mascara I complemented it with a little bit of gold shimmer from the shimmer palette in the last June 2013 Ipsy bag. I also put on some brown eye liner on top and below my lids. I also put on some kiwi lipgloss from Bath and Body Works, they literally have the best lip gloss ever, and of course foundation, concealer, and face powder. I hope you guys enjoyed this look, please comment, like, and follow me for some more lovin’. Thank for reading and love always Pearlsnheels ❤

wpid-IMG_20130702_195734.jpg

July 2013 Ipsy Bag Sneak peek #4 & #5

Hey ladies, it is that time again for another July 2013 Ipsy Bag Sneak peek! You can check my other blog posts listed below for items #1 #2 and #3 for more spoilers! Please comment down below, and let me know out of all four products what you are most excited for! Just to recap so far we have seen a spoiler for the Pop Lip Crayon, The Coola‘s Face Moisturizer, and Benetint by Benefit. Hope you enjoy the sneak peeks please remember to like and follow, and thanks so much for reading love always Pearlsnheels ❤

Sneak Peek #4:

BH Cosmetics California Collection Eyeshadow Sample

I wonder what colors we will all get! Hopefully this eye shadow palette will be for everyone! 🙂

33mlg1cSneak Peek #5:

Sexy hair brand, and is said to be either the beach spray or heat protectant!

I Love when they include hair styling products!

99l7ok

A Random Mini Haul: Odds and Ends

imageToday I made a little run down over to Target, and Walgreens and just picked up a couple things.

  • My phone case (on the far right) I got off of ebay, but I felt like I needed to include it, it’s just so adorable! :p If you would like to know where I got it let me know 🙂
  • In the middle, Is Simple brand Eye Makeup Remover Liquid from Target. It has a sale sticker on it, it was $8 but I got it for $4.88! I got introduced to this product by triedandtestedblogger, who wrote an amazing review on it, and I thought I would give it a go since I love Simple products. Check back for a a review 🙂
  • To the far left, is Loreal Paris 440 Black Quarts Double Extend Eye Illuminator. I saw this, even though it is meant to enhance brown eyes, thought the gold shimmer mascara end would look amazing. I am really excited to try this mascara, and think it is pretty cool it has a regular mascara on one end and a colored shimmer mascara on the other. I got this for $6 from Walgreens
  • On the top left, I bought the Loreal Paris Infallible Eyeshadow in 337 Endless Sea. I thought this color was gorgeous and would be very pretty for the summer! I have not tried these eye shadows before, but was very excited that they claim to be 24 hour wear! 🙂
  • Lastly, on the top right is the Lip Medex by Blistex. This was just a re-purchase for me, and is the 6th jar of this lip balm I have boughten. I absolutely love the way it feels on my lips! It has a minty tingle and feels so smooth, I definitely recommend this is your lips are feeling a bit sad lately 😛  I got this from Walgreens for $3

Sorry that these items are a bit random, but I figured I would share them with you 🙂 If you guys have any questions feel free to leave them, or want me to write reviews on any of these items and I will get back to you! Thanks so much for reading and love always Pearlsnheels ❤ 

Hair Of The Day: The 5 min. High Bun Tutorial

image

Want the look? This is a perfect look for when you don’t have a lot of time in the morning but still want to look somewhat put together for school, work, or going out with friends. This look is clean and classy looking, and perfect for those days when you want to skip the shower and your hair looks pretty dull. If you would like to see more posts on how to hair styles, let me know in the comments below! 🙂 If you want to see how I achieved this look then keep on scrolling. Please remember to like this post and follow me for some more lovin’. Thanks for reading and love always Pearlsnheels ❤

What you will need to complete this hair style:

#1) Some bobby pins, I used around 10 of them 

#2) Dry Shampoo 

#3) An Elastic band 

#3) A comb 

#4) A Bun sponge

#5) Some Hair

image

For this look you will need a bun sponge, I picked mine up from Clairs for about $5. I did not show the sponge in the picture above, because it was already in my hair :p So here is an image of one just so you know what I am talking about!

ring

If you do not have one or don’t want to spend the cash, you can get a similar look with a sock bun, made at home. There are millions of videos on this on Youtube you can check out for how to make/use one.

  1. To achieve this look, first comb through your hair. Release all the tangles and twists and smooth those strands out! I like to use day old unwashed hair for this look, because it seems to stay up on my head better, without any loose fly aways!
  2. Take your dry shampoo and spray some at the roots of your crown and sides of your head around your ears. Let the dry shampoo sit for a minutes, then work it into your hair.
  3. After the dry shampoo is applied to your hair, come through and start teasing! You can use a regular comb if you don’t own a teasing brush, and just give yourself a little bit of volume on the top of your head. This is just an extra quick step to give your up do a fuller effect.
  4. Now, pull your hair up on top of your head and secure it with an elastic band, preferably one that matches your hair color.
  5. Slide the hair doughnut or sponge onto the pony tail and down to the base of your head. It is better to use a sponge that matches your hair color incase any strands get loose and you can see the sponge.
  6. Spread the hair evenly over the top of the bun making sure it is completely covering the top of the doughnut.
  7. There are two ways of finishing this look.
  • You can use a hair elastic and just wrap that around the hair hat is over the bun. This is a cleaner tighter looking bun, and is faster! You can then take the excess pieces and wrap them around the base of the bun and secure with a hair color matching bobby pin.
  • OR the way I created my bun; After the hair was layed over the top of the bun evenly I took my hair and took the first front small section and pushed it up a little bit to give it volume and bobby pined it to the base of the bun. This way the hair is not tightly wrapped around the bun, but just hovering over it so the bun looks fuller. Continue doign this with each chunk of hair; grabbing, pushing up, and pinning it until you have done this with all the hair. Then takign all the strands extra and twirl them tight around your finger then wrap it around the base of the bun and bobby pin it in the back, that is how I acheived the spiral effect shown int he picture below.

8. To complete your look, you can add some hair spray for lasting hold if you would like, or take a small comb and smooth back the front of the hair do to make every thing look clean and elegant.

image

The Monthly Five: Fashion’s Hottest Trends.

Each month I will pick 5 of the latest  and best trends and blog about them. Here I will show you the 5 I have chosen, and what they are. Comment on which style you like the best, and have been wearing the most this summer! I hope you guys enjoy them, if you do please remember to like and follow for some more lovin’ 🙂 Thanks for reading and Love Always Pearlsnheels ❤ 

#1) Lace & Denim: For a casual everyday look that is comfy and functional, a lace cardigan is very in right now, with a neutral tank, and soft jeans. This look is very girl next door.

5d93f1ab86517d9bcb2f3827b31c2ede

#2) Lace Bottoms & White: It seems that you can’t go anywhere without seeing someone in a lace skirt or pair of shorts. Lace is sexy, and anything with hand done detail is in right now from crochet items to sewn embroideries. White as well is very in style, it looks clean and makes you look tanner!80cbb8201779be5519d494e4af4d4a2b

#3) The long skirt or Maxi dress: Currently anything that elongates the legs are in. It is summer, and we do what we can took look taller whether it is a pair of pumps or a really long piece of fabric called a maxi dress. Especially when it has a coral pop of color which is the epitome of fashion right now. 88d0284ad9ffeadf191f85a53fdbe6b5

#4) Beige & Nuetral: Lately the world wants to look a bit classier. With a beige blazer and a pair of dark flattering skinny jeans or leggings you are good to go. This year it is all about clean lines. 05817e171b901d4bfe28ae5e92c1efbd

#5) Denim & Tribal. Time to go wild world, tribal is in. Whether you have some sort of aztec descendant in your family or not tribal is what you are wearing! The prints are in from patterns, textures, and animal prints which ever one you’re wearing you can’t go wrong. Especially paired with denim. The 80’s are calling and they want their denim back! Denim button ups and vests are a summer go to for quick, comfortable, and affordable style! 964697f865e07c4f2aaacc42a9956acf

Ipsy Bag Item #3 Release! July 2013

This is the picture of the third released sneak peek of Ipsy’s July 2013 bag! Some say it is a product by “Coola” and it is an Spf facial product. I am not familiar with the company, but I am really excited that we are receiving a facial lotion product! We will have to see what this ends up being!  So far I am really excited with what, at least I think, we will be getting in this bag! Comment with your ideas on this product and what you think it is going to be! Please stay tuned for the other released products of this bag, and I will upload when I receive the full bag in the mail. Thanks so much for reading, and love always Pearlsnheels ❤ 
image

How To Grow Your Hair Out Long: Tips! 10 Steps To Save Your Strands!

image

A year and a half ago I had been an avid bleach using hair damager. I would get my haired bleached at the salon about every six weeks, and dry and damage it to the inch of its’ life. I would, on top of everything else, blow dry, straighten, curl, and tease my poor hair. One day upon looking down at my split ends and thinning hair, decided I want to grow out my hair healthy. This takes time, there is no miracle cure for damaged unhealthy hair, but if you really want to commit yourself, you will be very happy with the results! If you would like to learn how I did it, then keep reading 🙂

Tips On How I Changed The Life Of My Hair!

Some of these may be too much for you, or be too hard to stick to, but even just changing a few things can definitely help.

#1.  Drink water, and LOTS of it. Not only will you see a huge difference in your skin and nails, you hair will be hydrated as well. Water runs our body, so the more we have the better.

#2. Don’t shower every day. I was one of those people who showered every single morning because my hair felt greasy to me. Which, actually showering everyday makes your hair greasier, because your body is producing more oil because of the shampoo that is drying your hair out every day. Once you let you hair slow down, and shower every other day or every couple of days your hair will naturally go longer without needing to be washed. Between days, if you feel like you really need to wash your hair use some dry shampoo! This can be a savior and make your hair appear as if it was just washed, make your hair smell good, and give it volume! I like using the Suave dry shampoo.

#3. Watch out for what’s in your shampoo and conditioners. Sulfates and parabens are the devil to your hair! These ingredients are what makes your shampoo nice and soapy, but in reality strip your hair as well as causing dryness and color loss for people who have color treated hair. The more natural and organic your shampoo can get the better I personally enjoy cleansing conditioners, such as the one from Salon Graphics, they make your hair super soft and full of moisture.

#4. Take your vitamins. Your hair needs nutrients to grow, so make sure you are feeding it! I take biotin every single day, taking Bitoin also helps your hair and nails be healthy as well. You can also take Folic Acid, this provides your hair with a whole bunch of good nutrients it needs as well. Make sure you are having plenty of proteins as well; chicken, eggs, nuts, ect. Your hair needs protein to grow, and grow fast! Also, massage oil into your ends! There are countless Youtube videos out there about using coconut oil, and for good reason. Coconut oil can actually penetrate the shaft of your hair and work to smoothen your ends out, preventing breakage and damage. This stuff really is a miracle in a jar. I also like to use argan oil, on my ends after a shower to keep them tangle free.

#5. Give your scalp and hair some loving! I give my scalp a massage all the time. Massaging your scalp stimulates your hair follicles and kick them in to high gear, making them grow faster, this affect can also be done by using a mint shampoo. #6. No more brushing your hair. Brushes rip out your hair and isn’t very good for it. I am a comb only kind of girl now. I work through tangles gently at the ends and work my way up to my scalp slowly straightening it out to prevent any further harm to my strands of hair.

#7. Wear your hair up as often as you can. When your hair is hanging down around your shoulders, it can ketch on things and pull out. Every look down and notice hair on your jacket? That is all the lost souls! lol But avoid bobby pins and elastics with metal if you can, these can hurt your hair as well. I like to use scrunchies, even if it is a little bit seventies, and I always put my hair up at night when sleeping.

#8. Avoid the hot tools and dyes 😦 As much as you can… I know it’s hard to not constantly be changing your hair color, and give your self bouncy curls, or pin straight hair, but think about it you are literally pressing 300 degree metal against your sad ends :/ haha once in a while is okay, but try to be good to your hair. Also, it is much better to let your hair naturally air dry if you can manage, so you aren’t blow drying it dry then using a hot tool.  Also, if you must use heat make sure to use a heat protectant like the Tresseme Hair Protectant Spray. When it comes to hair dye I always would be dying my hair and wondered why it took forever to grow a cm. Since I have let my hair go to its’ natural color and haven’t touched it with dye it has grown ten times faster, but it’s all up to what you want your hair to look like.

#9. Trims? Bologna. Unless your ends are very split and damaged, then yes you need to trim off the damage and start fresh. But if you take care of your hair, then you should have horrible split ends and damage, so there is no need for trim. Think about it, every time you go for a trim you are just cutting off every inch you tried so hard to grow. Your hair grows from your scalp not your ends.

#10. Avoid the bad stuff. Some things just don’t go with hair growth, and certainly won’t help you in the process. STRESS…stress can even promote hair loss! So get a Coke Zero and relax to some Rihanna haha. Try and steer clear of chlorine, swimming is a summer must, but if you have to you can help your hair out by working some conditioner into the ends before hand, or Ion sells a spray that protects your hair, and hair color from damage done by the chlorine. Extensions are amazing, long hair instantly! But letting your hair grow naturally is a good way to go, sharp heavy clips and glue only holds your hair down and can cause balding patches! :0 Even some medications can cause hair loss or thinning so it is always good to check what you are putting in your body.

I hope you guys enjoyed reading this post! Thank you so much for reading, please like and follow me for more Lovin’ 🙂 Comment and let me know what you do to take care of your hair, as well if you have any questions on my process! I am thinking about writing a post on all the products I use on my hair, let me know what you think! I am not a salon professional or anything this is just what I do and works for me. Love always Pearlsnheels ❤ 

This is what My hair looked like before when it was platinum and severally damaged and thin: (I am on the right)164793_181557645212509_4675310_n

How to KISS True Volume Lashes

Screen Shot 2016-02-03 at 7.45.34 PM.png

Let’s face it, falsies can be really hard to apply! But after reading through this easy step-by-step how to guide on applying lashes, you will be an expert!

  1. Prep your faslies by peeling the lashes off of their holder and press them gently to your eyelid to see if the lashes are too long for your eye shape and size. If the lashes are too long feel free to cut them on the longer lash end so that the length is more appropriate.
  2. An easy tip is to take your lash glue and draw a line on a scrap piece of paper.
  3. Take tweezers and pick up your lashes in the middle of the strip. Then slide the lash strip through the line of glue to make sure the entire strip is coated with a thin layer of lash glue.
  4. The biggest mistake most women make when applying lashes, is applying the glue to the lash strip then attempting to apply the lash to your eyelid right away. This is a big NO NO! After applying the lash glue to your strip let the glue dry a bit, I’d say around 15-20 seconds.
  5. Once you see that the glue is a bit tacky and not completely wet still, the lash is reading for going on your eyelids. The reason you let the glue become tacky first, is that if you were to apply the lashes to your lid right away the lash would slide around and not end up sticking to your lid in the original location you placed it on your eye.
  6. With glue coated lashes held by a pair of tweezers start by pressing the lash strip on the middle of your eyelid. Then with the tweezers secure the inner corner of the strip to your inner eyelid. Lastly, secure with your tweezers the outter section of the lashes as well.
  7. To finish this process I like to gently take my finger and press down on the lashes to make sure they are securely in place.

-Than tada! You have successfully places your set of new gorgeous false eyelashes! Enjoy!


-I received this product free to test, but my options are all my own 🙂

Cetaphil® Moisturizing Cream Review

I received Cetaphil® Moisturizing Cream inside my Influenster Jingle VoxBox and was so exited to try it, for I have never tried this brand’s facial lotion before. Upon opening this cute little container I noticed how thick and creamy this lotion was. I decided to use it for a nigh time cream for my face. Before bed every night I wash my makeup off and then apply a generous amount of this good stuff all over my face and down my neck. In the mornings I have noticed an improvement in my skin’s smoothness and redness. I wakeup with soft to the touch skin without all those flaky dry patches that I usually tend to get in the colder season. If you are someone who gets constantly red or dry skin I would definitely recommend trying this facial moisturizer out. Another aspect I enjoy about this brand is the fact that the lotion did not contain any harsh chemicals, dyes, or perfumes which is a must for my super sensitive skin.

Screen Shot 2016-02-03 at 7.16.08 PM.png

  • I received these products complimentary for testing purposes.

Just got my JollyVoxBox in! Yay Christmas Samples!

Just got my JollyVoxBox in! Yay Christmas Samples!

Just got all my free Christmas samples in, in my Jolly Vox Box from Influenster.com
I got Skinny Cow Peanut butter chocolates, and NYC EYeshadow Trio in 781 Long Beach Sands, Some cute artsy paint splatter Ducktape, Rimmel London Show Off Lip Lacquer in 101 Celestial, and Puffs Plus Lotion tissues! What a cute box, and I am very pleased with the lipgloss and eyeshadow. Thanks Influenster!

Upcoming Posts!

Hey ladies, here is a sneak peak of up coming posts I will be adding this month, just to give you an idea of future things to read. 🙂

  • A Jollybox View, the Influenster Box I just received; opening + review
  • Christmas Makeup + Outfit look; Tutorial + pics
  • DIY Last minute Christmas Gifts
  • Makeup look staring the December Ipsy bag Products
  • New and Revised hair care update! How my hair has grown past my boobs 😉 from dead, damaged, and bleached
  • Current Skin Care; toners, lotions, primers, Witch Hazel, etc.!
  • Best Learned Beauty Tips!

Stay tuned to my channel for upcoming goodies! I look forward to sharing a lot this month with you guys, and can’t wait to enjoy all your posts as well! 🙂 Happy Holidays!